skip to main |
skip to sidebar
 Ingredients:Pate Brisee1 c. all-purpose flour (5-5 1/2 oz)6 tbsp cold unsalted butter (3/4 stick), cut into 1/2-inch slices1/8 tsp salt1/4 tsp sugarAbout 3 tbsp ice waterFilling1 large or 2 small leeks, trimmed, washed, and thinly sliced (2 cups)3/4 c. water4 large eggs1/2 tsp salt1/2 tsp black pepper1 1/2 c. grated Gruyere cheese1 1/4 c. milk1/4 c. heavy cream1. Preheat oven to 400 degrees.2. For the dough:Place the flour, salt & sugar in the bowl of a food processor. Pulse the mixture for 5-10 seconds, just until the butter is broken into small, but still visible pieces. Add the 3 tbsp ice water (you may need more or less, depending on the dryness of the flour) and process for 10-15 seconds longer. The dough may not have formed into a ball at this point; transfer to a bowl and press it gently together to form it into a ball.3. Place the ball of dough in the center of a sheet of plastic wrap about 13-in square, and lay another piece the same size on top. Roll the dough between the two sheets to form a circle about 13 inches in diameter.4. Remove the plastic wrap from the top of the dough and invert into a 9 1/2 x 1-inch quiche pan with a removable bottom. Before peeling the remaining sheet of plastic wrap off, use it to press the dough into place in the pan. The dough should extend about 1/2 inch above the edge of the pan. Roll or press this overhang back on the dough at the edge to make it thicker.5. Line the dough shell with a double-thick layer of aluminum foil, pressing gently into place. (The foil should be rigid enough to hold the dough in place as it cooks.) Place the quiche pan on a cookie sheet and bake the dough for 20 minutes. Then carefully remove the foil and bake for another 20-25 minutes, until lightly browned on the inside.6. Meanwhile, for the filling:Place the leeks and 3/4 c. water in a saucepan and bring to a boil over high heat. Boil, uncovered for about 5 minutes, until the water has evaporated and the leeks are soft.7. Beat the eggs in a bowl until smooth. Stir in the salt, pepper, cheese, milk and cream. Mix in the leeks. (There should be about 4 cups of the filling mixture. Reduce the oven heat to 375 degrees.8. Pour the filling into the pre-cooked dough in the quiche pan while still on the cookie sheet in the oven. The filling will come to the brim of the shell, and it's less likely to spill if you leave it in the oven. Cook at 375 for 20-25 minutes, until the filling is set and beautifully browned on top.9. Let the quiche rest for 10-15 minutes before cutting it and serving. Note: this can be baked ahead and reheated, uncovered, in a 375-degree oven until warmed through.My notes:OK, so as I mentioned before, I foolishly decided to start making this at like, 11:30 at night. As usual, I ran into a few stumbling blocks so I had to deviate a bit from the recipe. And because I got started so late, I ended up baking off the crust and making the leek filling, but waiting until morning to fill the shell and bake the actual quiche. And let me say, Jacques was not joking about the shell being very very full. I was going to stir it a bit to distribute the leeks and cheese evenly, but it was starting to overflow, so I had to just leave it as is.Cheats & Changes:First off, I ended up baking this in a 9" glass pie dish. It turns out my quiche/tart pan is too big by an inch, and there was no way I would have had enough dough to cover the whole thing. I'm a bit disappointed in myself for not realizing this before I rolled the dough out. So because I had originally rolled it for a different pan, the top of it looks rather ugly. Normally, I'd do a nice fluted edge.
I did chill the dough a little bit before rolling it out. In my experience, this makes the dough much easier to roll out and work with. You really want to handle it as little as possible to keep it from becoming tough, and keeping the butter cold goes a long way towards that goal. Keeping the dough cold also keeps it from shrinking quite as much once you bake it.Because the pie dish was much deeper than the tart pan and the filling was cold out of the fridge, I had to bake this longer, like closer to 45-50 minutes. I don't like for the whole quiche to be browned, so I baked it until the edges started to color and the center was set.The Verdict:It may not have looked very pretty, but it tasted pretty damn good. The friend I shared it with for lunch today also enjoyed it (Meighan, feel free to chime in!). The crust was flaky and tender, the filling was rich and velvety and packed with leeks and cheesy goodness. I think I could easily have eaten the whole thing by myself. Yeah, I'm piggy that way.I will say, I'm not sure I cared for the way the leeks were cooked in this recipe. There was quite a bit of water left in the pan after 5 minutes, so I ended up draining it off and letting it sit to steam/evaporate a while longer. I think next time I may sweat them in a saute pan with a little oil and get them to give up all their moisture as they cook.
I would also make sure next time to have the edge of the crust come up as high as possible in the pan. I had a bit of filling overflow at one side so that it was caught between the crust and the pan. Not a big deal, just a little unsightly.
I'm currently baking a quiche. Yes, I realize it's after midnight. This is my punishment for being a procrastinator. But I digress.I think from here on in, I'm going to start doing individual recipes. There are a few more full-dinner menus in the book, but some of the sections are now more focused on one ingredient or cooking method. It's also starting to become more difficult for me to do 3-4 recipes all in one evening. Anyways, I'm skipping ahead to a recipe from The Pastry Lesson. I figured, I already have all the ingredients on hand (and I desperately need to use things up before we go on vacation), so why not start with the Leek and Gruyere Quiche?I'll update with a full report tomorrow.
 Un-freaking believable! Or is that considered three words? Either way, the salted caramel ice cream turned out absolutely AMAZING. Smooth, rich, creamy, buttery, caramel-y goodness on a spoon. I shared a bowl with Troy last night, and I'm currently resisting the urge to go dig into it with a spoon right this second because once I start, I don't think I'll be able to stop. This is up there with Haagen Dazs Sticky Toffee Pudding ice cream, which is pretty much my all-time favorite (non-chocolate) ice cream.I only have a few very minor critiques. I think making the salted caramel praline a day ahead is a mistake. By the time I went to break it up and mix it in with the ice cream, it had absorbed moisture from the air and it was sticky and hard to work with. I lost a fair amount to the aluminum foil that I'd covered the pan with. In retrospect, I probably should have sprayed the foil with oil and/or used parchment. So rather than smushing it up into confetti-like pieces with a rolling pin, I ended up breaking the caramel up as best as I could by hand, and chunking them in all willy-nilly. Next time, I'll make it while the ice cream base churns.
I'm also not super happy with how the salt did not distribute very evenly, so I had some pieces that had large chunks of sea salt and others that had none at all. I did use Sel Gris (French sea salt), but I'm wondering now if maybe I should have pulverized it so it was finer and dissovled more easily in the finished caramel.
I churned the ice cream base until it was slightly softer than soft-serve consistency. I've found that with my machine, that's about as firm as it ever gets and I did not want to overmix the base. Then I quickly poured the whole thing into a wide, shallow tupperware (I usually go for a deeper one, but it was the largest clean one I had on hand), and let it chill in the freezer some more.
When I served it about 4 hours later, it was still pretty soft, but had a very silky smooth texture (thank you, mesh strainer). I had expected the candy pieces to soften up into ribbons of gooey caramel (as mentioned in the recipe), but I'm not sure they had enough time to absorb moisture. Instead, they were more like crunchy shards. Not terrible, and in fact I sort of dug the texture it added, but it was not quite what I expected.
T loved the ice cream too and pronounced the flavor "very intense." I had mentioned the option of adding some espresso powder to the mix (as suggested by the author), but he thought that would be overkill. I think it'd be really good that way though. And I wouldn't mind adding nuts next time as well, just to add another layer of texture, especially if the caramel bits do end up going soft, as they're supposed to. This would be super killer on an apple pie or tart, and if I weren't trying to clear out my fridge in anticipation of going on vacation soon, I'd be baking one right now.
If you own an ice cream maker, you must make this.
I love food/cooking blogs (surprise). There are a few I follow pretty regularly, but I also happen upon a lot of others at random. I know this blog is supposed to be for one specific cookbook at a time, but I'm occasionally going to post other stuff I make from recipes I've found online. And the bonus for me is I don't have to type in the whole recipe, just link. Yeah, I'm lazy like that. In fact, here are two recipes that I made just last week, from my other blog:
Summer Squash Gratin
Chocolate Matcha Cake
Today, I decided to bust out my ice cream maker for the first time this summer and make this recipe I've had bookmarked for Salted Butter Caramel Ice Cream. How freaking good does that sound?! I absolutely love combinations of sweet and savory, so this is right up my alley.It's a little bit more involved than your average ice cream recipe since it involves making caramel - twice. It also has to chill for several hours, so I won't be able to churn it until either late tonight or maybe even tomorrow. But so far, I think it's going to be worth all the extra work. The mix tastes absolutely heavenly!If you've never made caramel before, it's really not very difficult - essentially, you just put sugar in a pan and let it melt, adding butter or cream or whatever. Although, I will warn you that caramel can be a little dangerous. Melted sugar is the culinary equivalent of molten lava - no exaggeration. When I was in cooking school, I actually burned my hand very badly with caramel, to the point where I had to take a trip to the hospital. Not fun. So be forewarned, no matter how temptingly delicious it looks, do not stick your finger in for a taste!
I'll update with pictures and a review once it's totally done.
Ingredients:
1/4 c. honey
1 tbsp grated orange rind
2-3 tbsp orange juice
1 tbsp Grand Marnier
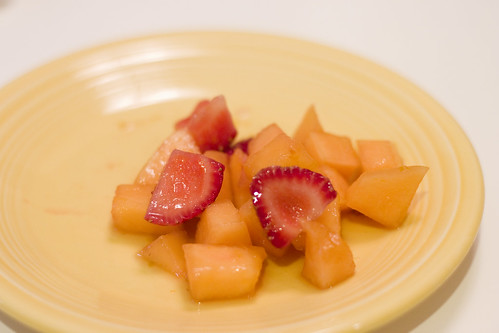
1 large cantaloupe (about 1 1/2 lbs), seeded, peeled, and cut into 1-inch pieces (2 1/2 cups)
1 cup strawberries, washed, hulled, and halved or quartered, depending on size (about 3/4 cup)
1. Combine the honey, orange rind, orange juice, and Grand Marnier in a bowl large enough to hold the melon and strawberries. Add both fruits and toss thoroughly.
2. Refrigerate until serving time (can be assembled up to 6 hours ahead).
3. At serving time, divide the fruit mixture among 4 goblets.
I used a "Tuscan Extra Sweet" Cantaloupe. It looks pretty much like a regular cantaloupe, except for greenish ridges on the outside that are supposed to fade in color as it ripens. It really was quite sweet and the rind was very thin. I think because of that, I didn't end up needing the whole thing - half of the melon yielded close to 3 cups, diced.
I also ran into some issues with my honey, which had crystallized. Running the bottle under hot water melted it enough to get it out of the container, and I even zapped the sauce in the microwave after mixing to try and get all the honey dissolved but I still ended up with some gritty bits in the bottom. By the time we ate the dish though, it either all disappeared, or we just didn't notice since I strained out the liquid as I served.
Cheats & Changes:
I left out the Grand Marnier since we had small children eating with us. I also once again used my handy microplane to zest the entire orange, which I think came out to more or less 1 tablespoon. I juiced half of the same orange which yielded just over 3 tbsp.
The Verdict:Like most of the rest of this menu, I thought this was good, but not a knockout by any means. And like the cole slaw, this was also a dish that benefited from having some time to marinate/macerate before serving. The melon I bought was so so sweet that I'm not sure the honey sauce really added anything. I think this would be better with either just the strawberries, or perhaps some melon that hasn't quite ripened. However, the kids loved it and had at least 3 (toddler-sized) helpings each. But I suppose they'll scarf down anything that's marinated in sugar or honey.
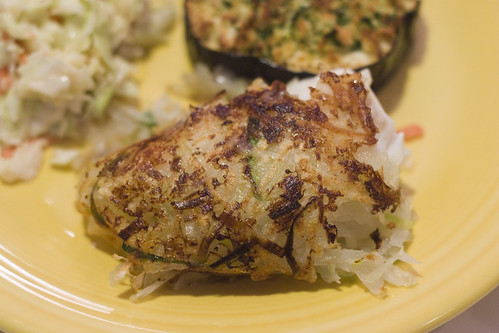
Ingredients:4 fillets of sea bass (about 1 1/2 lbs)2 lg Idaho potatoes (1 lb total)1/2 medium leek (about 3 oz) washed, and finely chopped (1/2 cup)1 tbsp cottonseed or safflower oil1 tbsp unsalted butter1/2 tsp salt1. Remove and discard any bones or sinews from the fillets. When cleaned, each fillet should weigh about 5 oz.2. Peel the potatoes (or leave them unpeeled, if desired) and wash them. Using hte side of a cheese grater with the large holes, shred the potatoes. (You should have about 2 1/2 cups.) Drain well in a colander, then place in a bowl with the leek. Mix well.3. At cooking time, place the oil and the butter in a large skillet, preferably nonstick, and heat until hot. Meanwhile, sprinkle half the salt on the fillets. 4. When the oil and butter are hot, place four, small, evenly spaced mounds of the shredded potatoes and leek (about 1/3 c each) in the skillet. Press a portion of the fish into each mound, and cover the fish with the remaining potatoes. Sprinkle with the remaining salt.5. Cook the potato packages over medium to high heat, uncovered for 6-7 minutes. Turn them carefully with a large spatula and cook them for an additional 6-7 minutes. They potatoes should be nicely crusted on both sides and the fish inside lightly cooked. Serve immediately. I ended up with two large fillets from the fish counter, and I had a bit of trouble cutting them into even portions since both pieces tapered at the end. After hemming and hawing a bit, I opted to cut them into 6 smaller pieces in the hopes that they would cook more evenly. Well, I didn't do a very good job since the pieces varied from 4 1/2 to 7 oz in weight. Oops. I tried to make sure the guys got the bigger pieces since I knew they would have bigger appetites. Troy confessed after everyone left that he was still a bit hungry.Cheats & Changes:I think I had way more than a pound's worth of potatoes, which turned out to be a good thing since I almost ran out. Although to be fair, I didn't do a very good job of portioning the potatoes either as I put them in the pan.I wanted to have my potatoes grated and ready to go before our guests arrived, so I held them in a bowl of ice water to keep them from discoloring. I drained them thoroughly and patted them dry with paper towels before cooking. I used just olive oil (my preferred cooking oil) for browning the potato-fish packets, and I found I needed more than the 2 tablespoons to get them nice and brown. But the tradeoff was that they were a little greasier than I would have liked. I think I might have made my potato layers too thick. The Verdict:I thought this was good. I'll confess, I don't cook fish at home very often. It's one of those things that I usually prefer to have in a restaurant, but it's nice to know that I could throw together something like this on my own. The prep was not nearly as time-consuming as I thought. The potato crust method seems a little bit dated, but then this cookbook is 13 years old, so I guess I can't complain about that. I was worried about over or undercooking the fish, but I think the potatoes made it pretty forgiving.Troy liked this. I think his exact words were, "Hashbrown-wrapped fish, what's not to like?" I think I would have preferred my fish cooked a little more simply, so I'm not sure I'd go to the trouble to make this again.
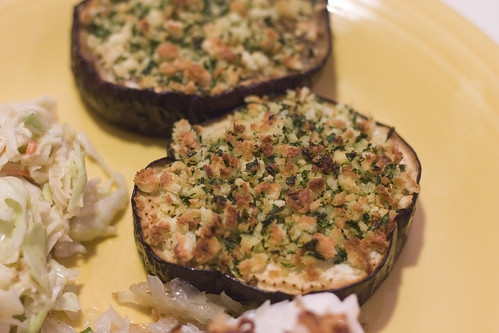
Ingredients:2 eggplants (about 1 3/4 lbs total), each about 3-4 inches in diameter1 1/2 tbsp canola oil3/4 teaspoon salt1 1/2 oz leftover bread, preferably from a baguette, cut into 1-inch pieces1/4 c. mixture chopped fresh chives and fresh parsley1 clove garlic, peeled2 tsp virgin olive oil1. Preheat the oven to 400 degrees.2. Trim the eggplants, peel them, and cut them into thick slices, each about 1 1/4 inches thick. You should have about 8 slices.3. Pour the canola oil on a large baking sheet, spreading it evenly. Press the eggplant slices in the oil and sprinkle them with half the salt. Turn the slices over, arrange them in one layer, and sprinkle with remaining salt.4. Bake the eggplant slices in the 400-degree oven for 30 minutes, or until the eggplant flesh is very soft.5. Meanwhile, place the bread cubes, herbs, and garlic in the bowl of a food processor, and process for 15-20 seconds. Transfer the crumbled mixture to a bowl and toss it lightly with the olive oil. Once the eggplant slices are removed from the oven, spoon the crumbs on top of them. 6. About 10 minutes before serving time, preheat the broiler.7. Place the eggplant slices so that the stuffing on top is at least 6-8 inches from the heat. Broil for 5-6 minutes until the topping is nicely browned. Serve immediately.Cheats & Changes:I did not have a baguette handy, so once again, I used leftover soda bread from the other night. I also totally forgot to peel the eggplant first, which was very dumb as I cannot stand eating the skin. I probably used twice as much oil on the pan as called for in the recipe since eggplant soaks that stuff up like a sponge.The Verdict:Much tastier than I thought it'd be. I loved the bread crumb topping. I had thought about subbing panko for the bread, and now I'm glad I didn't. I think the fresh bread made for a nicer texture. It was chewy and savory and garlicky good. T is not normally a fan of eggplant at all, so I was really shocked that he ate both pieces on his plate. I suspected that he did it out of politeness, but he says he really liked it. Usually the texture of eggplant is what bothers him, not the flavor, and in this case the bread crumb topping made up for the softness of the eggplant.Again, this recipe was very easy to make and slightly less boring than just broiling or grilling eggplant, which is usually what I do with it. Also a nice way to use up stale bread. I'll definitely make this again.
Ingredients:
1 small head cabbage or half a large head (1 1/4 lbs)
1 carrot (4 oz) peeled
1/3 cup mayonnaise
3 tbsp cider vinegar
1 tbsp sugar
1 tsp salt
2 tsp poppy seeds
1/4 tsp Tabasco hot pepper sauce1 tsp curry powder
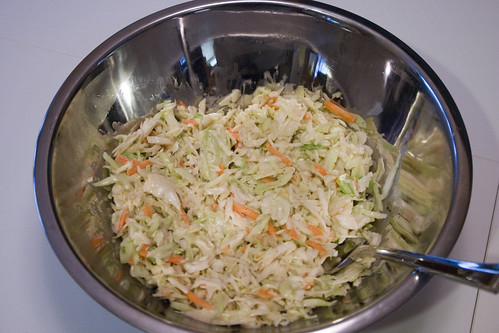
1. Trim the cabbage, removing and discarding any damaged parts, and shred it on a slicer or by cutting it into thin slices with a sharp knife. (You should have 5-6 lightly packed cups.) Shred the carrot (1 lightly packed cup).
2. In a bowl large enough to hold the finished slaw, mix together the mayonnaise, vinegar, sugar, salt poppy seeds, Tabasco and curry powder. Add the cabbage and carrots, and mix well. Serve immediately or cover, refrigerate, and serve later. The cole slaw will keep, refrigerated, for up to one day.So even though the recipe says to serve immediately, I'd recommend letting it sit, refrigerated, for a few hours first. I made this about 2 hours in advance and tasted it both right after mixing and just before serving, and I thought it the flavors had melded more and the cabbage had softened up a bit after having time to marinate.Cheats & Changes:
We had guests joining us for dinner tonight, and I was a bit short on time today. So despite what I've said about wanting to work on my knife skills, I used a pre-packaged cole slaw mix for the cabbage and carrots. I almost always have a bag in the fridge to add to stir-frys, wraps, etc. It's very handy.
I also used "light" mayonnaise because I forgot that was all we had in the house (T & I have been trying to diet). Otherwise, I would have splurged and bought the full-fat variety, which of course always tastes better. I also ended up leaving out the poppy seeds (despite making a special trip to the store for them) because they were out of them in the bulk section and I just couldn't bring myself to spend the money on a big bottle when I only needed about 10 cents worth. Yeah, I'm weirdly cheap that way.
The Verdict:Pretty tasty, although a bit salty, which is saying something coming from me, the original salt fiend. It wasn't overtly mayonnaise-y, and the curry powder added some nice heat, but it wasn't overpowering. In fact, most of my tasters tonight could not quite identify what seasoning was in the slaw until I told them.
T and our guests enjoyed this too and none of them are usually fans of cole slaw. I think the acidity of the vinegar cancelled out the mayonnaise, but in a good way. This dish is very easy to throw together (especially if you don't have to do any chopping) for a quick side/salad, but I'd reduce the salt by half. I might also reduce the vinegar and/or up the sugar by a wee bit next time as I thought it had a little too much tang as well.
I have to admit, I'm really starting to enjoy this little project. It's nice to cook real food on a regular basis. I usually only cook 3, maybe 4, days out of 7, and the rest of the time we eat leftovers, "scrounge," or eat/take out. So even though I still have yet to edit yesterday's photos and get those up, I'm already planning on cooking again tomorrow night, this time for guests!Tomorrow night's menu:Eggplant CushionsSea Bass in Potato CrustCurried Cole SlawMelon and Strawberries in Honey Sauce
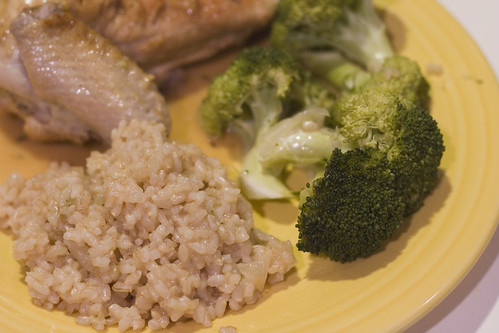
Confession time: In case you haven't noticed, I dropped the last course. It was essentially just fresh pears served with unshelled nuts which you roasted in the oven at 375 degrees for 30 minutes. Pears aren't really in season right now (in fact, they didn't even have any at the store yesterday), and I also just wasn't in the mood to go on a mad hunt for unroasted, unshelled nuts. If I happen across either this fall, I'll make the effort to come back to it. Otherwise, sorry kids. Two menus in and I'm already skipping recipes. *sigh*In any case, this was really a standout menu. Troy and I thoroughly enjoyed this meal, much more so than the previous one, and I'm planning on adding it to my regular repertoire of dinners. Even with a crabby toddler hanging on my legs, I still managed to get everything prepped and cooking in about 20 minutes. It worked out so that by the time we got her off to bed, I had just enough time to make the salad and then T & I sat down and ate everything in peace. Ahhhh.I especially loved the chicken, and I can already see myself making it often this winter with a whole cut-up chicken. I love anything that makes it's own sauce, as well as gives me a chance to use my big dutch oven. Salad was great too. Very light. As I mentioned before, T said he'd eat that salad anytime. I will probably add tomatoes to it the next time I make it. Not traditional, I know, but I love tomatoes in my salads.I think the etuvée was a bit of a dud, although I did like the idea of steaming vegetables on top of the rice to save time and space. I'm still 50-50 on whether I'd make this particular recipe again, but I'll probably file away the veg idea for future use, maybe with a quinoa pilaf.
Ingredients:1 tsp peanut or cottonseed oil3 tbsp chopped onion1/3 c. short brown rice (1 1/2 oz)1 c. chicken or beef stock, preferably homemade unsalted and defattedSalt to tasteDash red pepper flakes1 stalk broccoli (3-4 oz)2 tbsp grated Swiss cheese1. Heat the oil in a small sturdy saucepan. When it is hot, add the onion and cook over medium heat for 2 minutes, stirring occasionally until lightly browned2. Add the rice, stir well, then add the stock, salt and red pepper flakes. Bring the mixture to a boil, cover, reduce the heat to very low and cook for 30 minutes.3. Meanwhile, peel the broccoli stem to remove the fibrous skin. Cut the peeled stem in 1/2-inch pieces and the flowerets into 1-inch pieces4. When the rice has cooked for 30 minutes (it will still be soupy), place the broccoli on top of the rice (don't stir it in). Cover and cook over low heat for 10 minutes. Add the grated cheese, stir and serve immediately.It's not explained very well in the book, but basically the phrase "etuvée" refers to a method where you cook over low heat, using a small amount of liquid, and with a tightly covered pot. It's also referred to as à l'étouffée, which comes from étouffer or "to smother." All that to say, it's more or less a brown rice pilaf.Cheats & Changes:Other than doubling, none. I followed the recipe exactly. However, once doubled, I thought this made closer to 3 portions of rice. We ended up with about 3/4 c. left over.The Verdict:Meh. Even after simmering an extra 10 minutes, the rice was very very soupy. And as a result of having to let it cook longer, the broccoli ended up a bit gray and overcooked. It wasn't total mush, but it didn't have as much bite to it as I normally like.I suspect that the rice-to-liquid ratio is off. For brown rice, I usually use 1 1/2 times as much liquid as rice, but this recipe called for 3x as much liquid. Just for kicks, I did just now weigh out 1/3 c. of my short-grain brown rice and it came out to over 2 1/2 oz., so really I'm just bamboozled by the whole thing. I'd probably make this again, but reduce the amount of broth by at least a third. Flavor-wise, the dish was just fine. I think the addition of the grated cheese at the end was key - it added a lot of flavor and a little creaminess too. Otherwise, I'm not sure I'd bother to make this again since I usually just cook brown rice in my rice cooker.
T didn't seem to notice or mind the extra liquid and he declared that he enjoyed every item on his plate and would happily eat it again.
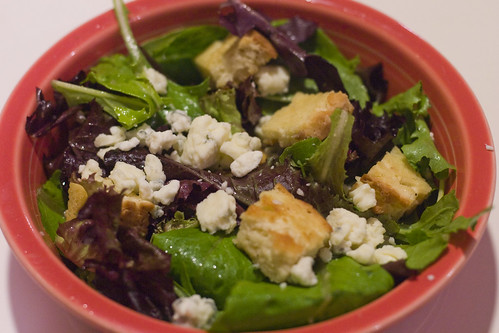
Ingredients:2 cups loosely packed escarole1 slice stale bread (about 1 oz)1 1/2 tsp canola or peanut oilDressing:1/2 clove garlic, peeled1 anchovy fillet in oil, coarsely chopped2 tsp fresh lemon juice1 tbsp olive or peanut oilDash saltDash freshly ground black pepper2 tbsp crumbled blue cheese, or a combo of blue with pieces of Cheddar, Camembert, etc.1. Preheat the oven to 400 degrees.2. Remove and discard any wilted or damaged areas from the alad leaves and break the greens into 2-inch pieces. Wash and dry them thoroughly in a salad spinner.3. Brush both sides of the bread slice with the oil and place it on a small baking sheet. Place in the 400-degree oven for 10 min or until nicely browned on both sides. break or cut into 1-inch pieces.4. Mash the garlic clove with the tines of a fork into a coarse puree. Combine it in a small bowl with the chopped anchovy, lemon juice, olive oil, salt and pepper.5. No more than 30 minutes before serving time, add the salad greens to the dressing in the bowl and toss well. Sprinkle with the croutons and cheese, serve immediately.Again, I doubled this. It ended up being enough for 3 small side salads. I used some of the leftover soda bread from yesterday to make the croutons, which turned out delicious. I'm not normally a big fan of croutons since the store-bought kind are always rock hard, but these were perfect. Nice and toasty/crunchy on the outside, but still a bit of chew to them.I assume that the reason Jacques refers to this as "mock" caesar salad is because of the lack of raw eggs. I think nowadays, most people exclude that part anyway (or use a pasteurized or coddled egg instead), although the dressing definitely was more of a vinaigrette without an emulsifying agent in there. I also thought it interesting how he refers to blue cheese as the standard choice. I think most caesar salads I've had in restaurants use parmesan. I'm not sure if that's because parmesan is a more innocuous choice or not. I'll have to do a little research on "traditional" caesar recipes.Cheats & Changes:I think I used a little bit less olive oil than called for in the dressing recipe. I'm not entirely sure, since I sorta eyeballed it. I probably could have done a better job mashing up the garlic, and next time I'll probably just use my (gasp!) garlic press. Oh, and I'm super lazy when it comes to salad, so I almost always use pre-packaged mixed spring greens. I'm partial to the Earthbound Farms organic stuff. What else...oh, I used my toaster oven to make the croutons so I wouldn't have to heat up the whole house with the oven. I gotta scrimp where I can now that we're in the thick of the Texas summer. Bleh.The Verdict:Again, T & I both really liked this. I thought the anchovy was going to be a problem for Troy, but surprisingly, he really liked it. He later told me that he had sardines and anchovies confused, thus last night's disappointment. The anchovies added a nice saltiness and just a hint of brine. I think if I hadn't mentioned it, he never would have known they were in there. T declared this a vast improvement over last night's salad.This was very quick to make. I tossed everything together while the chicken and rice were cooking and it all timed out perfectly. T told me he was still thinking about the salad this afternoon, so I will definitely be making it again.
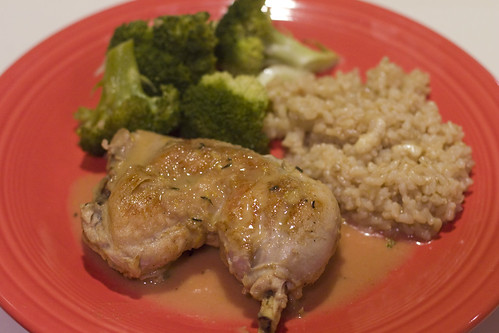
Ingredients:1 tsp olive oil1 chicken leg (8-10 oz.) with skin, back bones, and tips of drumsticks removed (about 6 oz, trimmed weight)Dash salt1/8 tsp chili powder1/8 tsp cumin Dash dried thyme Dash cayenne pepper1/2 tsp all-purpose flour1 strip lemon peel, removed with a vegetable peeler1 strip orange peel, removed with a vegetable peeler1 tsp chopped fresh ginger (washed, but not peeled)1 small clove garlic, peeled1/4 c. sweet apple cider1/4 c. water1. Heat the oil in a large saucepan until it is hot by not smoking. Add the chicken leg and brown it over medium heat, turning occasionally, for 10-12 minutes.2. Add the rest of the ingredients, bring the mixture to a boil, reduce the heat to low, cover, and cook gently for 15 minutes. Serve with the natural cooking juices.I doubled this and all the other recipes so that there would be enough for both Troy and I. More on other changes below.Cheats & Changes:Again, I used my microplane to zest the orange and lemon rather than peel big hunks off. I also used a tablespoon of garlic ginger paste (I keep a jar handy in my fridge at all times; you can find it at most Indian grocery stores) in lieu of the fresh chopped ginger. I suppose I could have left out the garlic cloves, but in my book you can never have too much garlic.Also, I'd like to mention that the directions on the chicken are a bit vague. In the accompanying photo, there's a chicken leg quarter, not just the leg, and it has the skin on it. I decided to split the difference and I used a quarter, but took the skin off. T actually prefers white meat, so when I saw they had split fryers at the store, I opted to buy that so we'd have the best of both worlds. I cut the chicken into two pieces, removed the skin and backbone, as instructed, and I left the wing on the breast, but removed the wingtip. Frankly, we're both rather big eaters, so there's no way that one measly chicken leg would have cut it. But because I used a bone-in chicken breast, it took a little bit longer to cook, I'd say closer to 20 or 25 minutes.The verdict:Love, love LOVED it! The flavor was really well balanced - hints of ginger, citrus, spice, and a little bit of sweetness from the juice, but not overtly apple-y. This dish was super easy to prep and make and will probably go into my regular repertoire. T loved the flavor as well and devoured his portion. I was concerned that the breast might dry out, but it stayed super tender and juicy.
And have I mentioned the sauce? This dish made its own sauce (the aforementioned "natural juice") which was simply heavenly. There was a ton of it, which I spooned very generously over everything on my plate: the chicken, the rice and even the broccoli. I think it made everything better.
Portion size was perfect for the one meal, but in the future I'll likely make a lot more since we like leftovers. Oh, and even though it's dark meat, with the skin removed and very little cooking oil needed to sear it off, this is a pretty diet-friendly meal too. Extra bonus!
Oh and here's a picture of Troy's chicken breast, in case you're curious. I removed the skin from the breast, but left it on the wing.
Call me crazy, but I think I'm going to attempt another menu tonight. Just don't get used to seeing a new one every day because I'm one of those people that somehow manages to use every pot, pan and dish when I cook, so it is hell to keep my kitchen clean. Anyways, Troy is working late tonight, and my original dinner plan fell through, so I've decided to skip ahead a couple menus in the book and do this one, although I'm going to double it so that T can eat it when he gets home.Tonight's menu:Mock Caesar SaladSpicy Ginger and Lemon ChickenBroccoli and Rice "Etuvée"Pears and Roasted Nuts
**pictures have been added to previous posts**
Final notes and thoughts on the menu: Overall, I really enjoyed this meal, chewy meat and all. Troy thought that it was a bit overly fancy for everyday. I'm not sure that I'd really label it as an "Easy Shortcut" meal, like the name implied. There's a fair amount of chopping and prep, as well as a few ingredients that I don't normally keep on hand. So compared to just slinging steaks on the grill and chucking some pre-washed mixed spring greens in a bowl, it's a bit more work. As T said, it was too fancy for everyday, not fancy enough for company.I did like the Soda Bread recipe and will definitely remember it for those occasions when I need a quick loaf of bread. And the blueberries were a very simple and delicious dessert. A little nicer than just eating them plain, but not as decadent as if you were to serve them with a shortcake and whipped cream.
The only real dud was the sardine salad, which I sort of expected. And even though I liked the herb butter for the steak, it's unlikely that I'll make it very often since we just don't do a lot of pan-frying around here. One huge perk to living in Texas is being able to grill year-round, and we take full advantage of it. So whenever I buy steaks or salmon or pretty much anything that can go on the grill, that's where it goes.
Ingredients:1 lemon1/4 c. maple syrup1 pint (12 oz.) blueberries, preferably small wild ones1. Using a vegetable peeler, remove 4 pees from the lemon and set them aside. Cut the lemon in half, and press it to obtain the juice (about 2 tbsp).2. Mix the lemon juice and maple syrup in a bowl large enough to hold the blueberries.3. Rinse the blueberries well in cool water, removing and discarding any damaged berries or foreign matter. Drain the berries well, and add them to the syrup mixture, along with the lemon peel. Mix well and refrigerate for at least 1 hour before serving.I made this recipe once before, when I first got this book. I'm embarrassed to admit, it was kind of awful, in large part because I think I used Mrs. Butterworth instead of real maple syrup. Gag. Thankfully, I now know better. Cheats & Changes: I zested the entire lemon with my handy microplane grater rather than shave a few slices with a vegetable peeler, as stated in the recipe. I think you get more lemon flavor, plus it looks nicer than having these large, inedible hunks of peel.The Verdict: T & I both really loved this. In fact, we snarfed it down so quickly (and straight out of the serving bowl, no less) that I forgot to take pictures before it was all gone. Oops. Just picture fresh blueberries, in a light syrupy glaze. And pretend that the picture is perfectly lit and in-focus.The lemon juice and maple syrup was a surprisingly nice combo - very light and sweet and refreshing. I think it'd actually be a nice glaze for other fruits as well. I will definitely be making this again, in fact probably tonight since I have about a pound of blueberries still.
 Ingredients:3 c. all-purpose flour1 1/2 tsp salt1 1/2 tsp baking powder1 1/2 c. milk1/2 tsp canola oil1. Preheat oven to 425 degrees.2. Reserve 1 tsp of the flour and combine the remaining flour with the salt & baking powder in a large mixing bowl. Add the milk, and mix gently and quickly with a wooden spatula until the mixture forms a solid mass.3. Oil an aluminum nonstick baking sheet with the canola oil, and place the dough on the sheet. Using a piece of plastic wrap, press and mold the dougt to create a round loaf about 7 inches in diameter and 1 inch thick. Sprinkle the reserved teaspoon of flour on top of the loaf and using a serrated knife, make two intersecting 1/4-inch deep cuts across the top surface of the loaf to create a cross.4. Place a stainless steel bowl upside down over the bread, and place it in the 425-degree oven for 30 minutes. Uncover and cook at the same temperature for another 30 minutes.5. Using a hamburger spatula, remove the bread from the baking sheet, and set it aside to cool on a rack for at least 30 minutes before slicing and serving.This is also pretty straightforward recipe for a quickbread; it's almost like a giant biscuit. I do think it's funny that Jacques's version of Soda Bread doesn't use baking soda, but he does say that you can substitute baking soda and buttermilk for the baking powder and milk, respectively. I may give that a try. I was nervous about potentially sacrificing one of my nice metal mixing bowls to the oven gods, but it came out unscathed.Cheats & Changes:My mound of dough did turn out to be bigger than 7" in diameter and 1" in height, but it seemed to bake up just fine. Oh, and I used an canola oil spray on my sheet pan instead of rubbing the canola oil on it. I figured it was the same difference. I'll also note that I didn't need to use the plastic wrap to mold my bread, it was pretty dry. In fact, I had to knead it a bit by hand in the bowl to get all the flour worked into it. But I'm sure that will vary from person-to-person and place-to-place.The Verdict:T & I both really liked it. It had a biscuit-y sort of flavor to it. I do wish that it had risen a little more. It seemed a wee bit on the dense side, as you can see from this cross-section photo.
 I think my oven may not have been quite hot enough when I put it in. I may crank the oven to 450 next time and leave it on that for the first 30 minutes. I also baked this at the same time as the potatoes and onions, so my tiny little oven may have been overloaded, which would also affect the oven temp and how the bread rose.
Ingredients:4 baking or all-purpose potatoes (about 8 oz each), left unpeeled, but washed and any dark or damaged spots removed4 medium onions (about 5 oz each), left unpeeled (Vidalia or Maui onions are a good choice)1 1/2 tbsp peanut or safflower oil1/4 tsp salt1. Preheat oven to 400 degrees.2. Split potatoes in half lengthwise, and cut the onions in half crosswise. 3. Pour the oil on an aluminum jelly roll pan. Sprinkle the salt over the potatoes and onions, and place them cut side down in one layer on the oiled pan.4. Place the pan on the bottom rack of the 400-degree oven (or, if you want the underside of your vegetables very crusty, on the oven floor). Bake for 40 min until the potaotes and onions are tender when pierced with a fork, lightly browned on top, and dark brown on the underside.5. Set the potatoes and onions aside to rest for 10 min., lift with a spatula and serve.This is a pretty straightforward recipe, just cut everything in half, season and place cut side down on an oiled pan. One caveat though - make sure you put down some foil or parchment first. I've positively RUINED some of my nice nonstick baking sheets doing this in the past. Cheats & Changes: I used several smaller potatoes that I already had in the house instead of the large baking potatoes. I also ran out of room on my pan and only cooked one onion (a Texas 1015), since I knew that neither Troy nor I would really want to eat one whole onion each. I also realized after the fact that I'd cut in half lengthwise instead of crosswise, meaning that instead of having rings, I had "petals." No big deal, really, it just wasn't as pretty. I baked this on the bottom rack underneath my soda bread, so it took a little longer than the 40 minutes stated in the recipe. Not all the potatoes got as brown as I would have liked, but they were all cooked through and tasted fine. I made extra to use for hash browns or whatever later.The Verdict: T and I both loved this dish. I think we both tend to favor food that's simply cooked. The potatoes were a no-brainer since we both love potatoes in any form, but the onions were a bit of a surprise. They were nicely cooked through, sweet (definitely use a sweet onion if you can) and the carmelized bottom gave it a little more depth of flavor. Both of us thought that the dish did need more salt, but then again, we like our food salty. I'll definitely make this again as an easy side, especially if I already have the oven on for something else.

 Ingredients:4 beef shoulder blade steaks (chicken steaks), 5-6 oz each1 1/2 tsp virgin olive oil1/4 tsp salt1/4 tsp freshly ground black pepper2 tbsp chopped shallots1/3 cup water1 tbsp unsalted butter1/4 c. fresh herbs (tarragon, chives, parsley, etc.), finely chopped1. Heat a large, sturdy skillet (cast iron or heavy-duty aluminum, not nonstick). Brush the steaks on both sides with the oil, sprinkle them with salt & pepper and place in the hot skillet. Cook for 2-3 min over medium to high heat on each side for 1-inch steaks (medium-rare). 2. Remove the steaks from the skillet and place them on the platter. Add the shallots to the drippings in the pan and saute for 20 seconds. Add the water to the skillet, mix it in well, and cook, stirring until all the encrusted juices in the skillet have melted.3. Add the butter and the herbs to the mixture in the skillet and cook for a few seconds, just until the butter melts.4. Spoon the butter/herb mixture over the steaks. Serve immediately.I have to confess, I'm not as well-versed on my cuts of meat as I should be. We studied them briefly when I was in cooking school, and I'm sure I took some sort of general test on the big cuts, but to my disappointment, we never got all that much into butchering and individual cuts. When this recipe called for shoulder-blade steaks, I have to say I was at a bit of a loss since it sounded totally unfamiliar. So off I trekked to Central Market to ask at their meat counter. According to the guy I spoke with there, it's not a common cut anymore because most places don't hang their meat and butcher it on the spot. But he said that the closest thing to it would be a chuck roast/steak, which is from the same part of the cow, just minus the bone. I debated whether or not to just get a ribeye or t-bone or something like that, but I decided to try and stick as closely to the recipe as possible. I had the butcher cut a big chuck roast in half lengthwise and ended up with 2 very large 1 1/2-inch steaks that I cut in half. In retrospect, I probably should have gone with thinner steaks since it turned out to be difficult to get the steaks to cook through in a short time without incinerating the outside.Cheat & Changes:Just the cut of meat, as mentioned above. I also found that my pan got so incredibly smoking hot by the end that when I added the water to deglaze the pan, it evaporated almost immediately. I ended up adding closer to 2 tablespoons of butter at the end to make up for it. I figure a little extra butter never hurt anyone.The Verdict:Me: It was so-so. It would definitely have been better with a different cut of meat. Jacques picked this cut because it's inexpensive, and according to him, the connective tissue in this cut melts away during cooking making for a lean and flavorful steak. I have to heartily disagree. Barring the fact that I may have been led astray by the butcher, a chuck roast is something that I usually buy for stew or braising. I'll admit, I undercooked my steak quite a bit, which made it even chewier, and eventually I had to give in and throw it in the microwave for about 30 seconds to get it closer to medium rare. But even if I had not, I think it still would have been hard to eat and it also had a lot of unpleasant fatty bits.I really liked the herb butter/sauce. I used pretty much the exact herbs he mentions in the recipe - tarragon, parsley & chives. Tarragon is definitely not something I use regularly, but I really enjoyed the flavor in this dish. And this sauce is such an easy extra touch, I can see myself doing this for fish or chicken or any other simple, pan-fried protein.T felt pretty much the same as me about the cut of meat. In fact, when I asked him specifically about it, he confessed that he didn't care for it much at all, but again, he ate it. He thought the herb butter was nice, but unnecessary. I believe his exact words were, "it's fancier than it needs to be." T prefers his food to be simply prepared, so he can really taste the ingredients. Most of the time, I do too.
Tonight's dinner had highs and lows. For sake of readability, I'm going to break it down into separate posts, recipe-by-recipe.Greens and Sardine SaladIngredients:1 (4 oz) can sardines in olive oil1/2 c. chopped onion3 plum tomatoes, cut into 1-inch dice (1 1/2 cups)2 1/2 tbsp virgin olive oil1 1/2 tbsp red wine vinegar1/4 tsp salt1/4 tsp freshly ground black pepper5 cups salad greens (Boston lettuce, escarole, and other varieties), trimmed, rinsed and thoroughly dried1. Reserving juices and oil in can, cut sardines into 1-inch pieces. Place the pieces in a large salad bowl, and add the reserved juices and oil. Add all the remaining ingredients except the greens to the bowl and mix them gently.2. At serving time, add the greens to the bowl, toss to coat them with the dressing and divide among four plates for serving. (Alternatively, arrange the greens on individual plates or on a large platter and spoon the sardine mixture on top.) First off, a confession: Troy and I aren't really big fans of sardines. But we knew going into this whole endeavor that we'd have to keep open minds and that we'd more than likely have to eat things we don't normally care for. Although to be honest, I don't think I've eaten a sardine in the last 10 years and tastes do change over time. Don't quote me on it, but I think I read a factoid somewhere that your taste buds completely change over every 4 years or something like that, not to mention that they do get duller over time.
I tasted a chunk of sardine as I was making the salad tonight, and I have to say, I was pleasantly surprised. It was fishy, but not overly so. Not quite as briny or salty as I thought it'd be; it more or less tasted like tuna. I'll add that I think being packed in olive oil makes everything taste better, so that's probably a big factor.Cheats & Changes:I made only a few minor changes. I used 2 small vine-ripened tomatoes from the farmers market in lieu of the 3 plum tomatoes called for in the original recipe. I didn't chop up the sardines either because they were boneless and skinless and I knew they'd break up into small pieces on their own when I tossed the salad. I also left out about a tablespoon of the e.v. olive oil since there was so much of it packed in the with the sardines.The Verdict: I liked it, but didn't love it. There are two servings left that neither of us wanted and sadly, since the greens won't keep well in the fridge, it's going to end up in the trash. T: Didn't care for it (he's not a fan of canned tuna either), but he ate it.Would I make/eat this again?As printed, probably not. The addition of the sardines wasn't so wonderful that I'd go out of my way to keep them on hand, never mind that Troy won't eat them. And without them, it's otherwise just a basic green salad with a red wine vinaigrette.
 So as mentioned before, for my first cook-a-book I'm going with one of the first cookbooks I ever bought, Jacques Pepin's Kitchen: Cooking with Claudine. The premise of the book is that he is teaching his adult daughter how to cook, both for herself and for others (it's a companion book to a PBS series). The book is organized into menus, and I'd say it's targeted at beginners, with a nice progression; some of the menus toward the end do get more complex. I like that there is a pretty wide range of menus and ideas in the book. There's a section for "the busy single," as well as cooking for dinner parties, but for the most part, the recipes serve 4.To kick things off, I'm going to go ahead and do the first menu listed, which is called "Easy Shortcut Supper."Tonight's menu:Greens and Sardine SaladShoulder Steak with HerbsRoasted Potatoes & OnionsSoda BreadBlueberries au CitronBack later with details and photos.
So what the heck do I need another blog for? Well, I've been feeling sort of melancholy lately, mostly about not pushing myself to do more, creatively, but also about not having gotten as far in my culinary career as I would have liked before I had kids. Not that I ever wanted to own a restaurant or anything like that, but I have such a passion for food that I feel like it's a shame to let that fall by the wayside. So this is the grand master plan: I'm going to start picking out cookbooks from my ever-growing collection, which I think currently stands at about 50+ (and some of which I have shamefully never even cracked open), and methodically cook my way through each of them.
The goal is to cook every single recipe in the chosen book, although I make no promises that I will actually be able to complete each one. I suspect that some recipes just might not be possible, perhaps because the ingredients are impossible to find or they're simply beyond my skill level. I'm also not sure if I'm going to cook the recipes in order or not. I guess it'll all depend on how it's arranged and how I'm feeling. There are no hard and fast rules here, at least not yet. My end goal in doing this is the hope that it will force me to hone my rusty skills, expand my palate, teach me some new techniques, as well as give me inspiration to come up with my own ideas and recipes. It'll also force me to cook more in general, and to have people over to eat more often. And ideally, I'd like to take some nice photos of each dish as well so I can work on my photography skills too, but that might be pushing my luck. For my first cook-a-book, I'm going with one of the first cookbooks I ever bought: Jacques Pepin's Kitchen: Cooking with Claudine. I remember watching the accompanying show on PBS way back when and being really drawn in by how easy everything looked. At the time, I had no idea who Jacques Pepin was, only that Claudine came off as a total moron and if he could teach her, well then maybe I could swing it too. I remember making a fair number of the recipes in that book, mostly for friends who didn't cook much and were easily impressed. I'm hoping that people will be just as impressed now, 10+ years later.
So bear with me on this work in progress. And I welcome any and all (constructive) criticism, so please feel free to leave comments!