
Today I'm going to talk about the most fun part - icing and decorating the cookies! I won't lie, this part requires a fair amount of dedication because the real key to making beautiful, elaborately decorated cookies is time and patience. As I mentioned in part one, you want to allow yourself at least 3-4 days to make decorated cookies. These are definitely NOT something that can be whipped up the night before a big party. Why so long? Because the icing can take up to a full 24 hours to dry, and depending on how you want them decorated, you may have to wait for one color to set before you can start on another.
For the icing, I stick with the standard royal icing, which is basically egg whites and powdered sugar. You can use real egg whites, but I prefer meringue powder because it's less hassle to deal with, and it's also been pasteurized, which makes it a little bit safer. You should be able to find meringue powder in the cake decorating aisle at places like Jo-Ann, Michael's or Hobby Lobby. It pretty much lasts forever, so it's worth springing for.
Anyways, I pretty much just mix the powder according to directions, which in my case was 1/4 c. powder beaten with 1/2 c. water until peaks form, then add 4 c. sifted powdered sugar. This makes for a pretty stiff icing, but don't worry about that for now. You'll be able to thin it out later as needed. Next, you'll want to start breaking your large batch of white icing down into smaller colored ones.
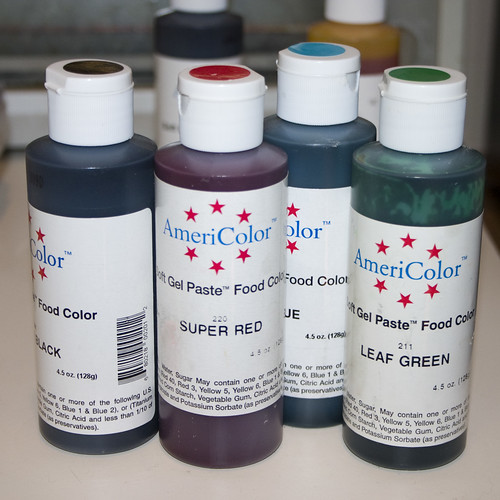
Let me add a word here about food coloring: most of what you can buy at the regular grocery store is crap. Don't bother. For one thing, you'll likely have to use half a bottle to get even remotely close to the shade you want. And for another, most of that stuff is water-based, which means it's going to thin out your icing and make it very difficult to pipe.
Gel-based coloring is the way to go. Again, you should be able to find these in the cake-decorating aisle of your local craft store. Wilton is probably the most readily available. In a pinch it'll do, but honestly I don't care much for the Wilton-brand colors. For one thing, they come in these annoying little pots with screw on lids, which makes them super messy to use (not to mention that they tend to leak if they're not upright), but again, the colors just aren't very deep and I find myself having to use a lot to get the bright reds and greens for Christmastime.
If you can, find a cake supply store or go online and buy the professional ones. They're more expensive, but worth it. I use these AmeriColor Soft Gel Paste Food Colors
OK, done with the plugs, now back to the tute.
Now here's one thing you need to be aware of: royal icing turns to cement when it dries. It is a total pain in the arse to clean up, and you really don't want to spend the next few days soaking and scraping it off of a million various bowls and spoons. So here's my tip: save a bunch of plastic containers, preferably with lids. I've been hoarding sour cream and yogurt containers for the past 2 months, along with plastic knives and spoons from takeout places, etc. Or if that's not an option, use plastic cups. This way, when you're done, you can just chunk everything into the trash. When you're not using any particular color, lay a damp paper towel on the surface of the icing and then cover with the lid or plastic wrap. This will keep the icing from drying out in-between uses.
Most people start by piping the outline of the cookie with the stiff icing and then thinning it down and "flooding" the outline to fill it in. Because my entire background is going to be one color and also because I don't like waiting for the outline to dry before I can flood, I usually just glaze the entire cookie with the thinned out icing and then go back and do the outline later. If you prefer a crisper look, then you can pipe the outline first. It all comes down to personal preference.
So after scooping some icing into a separate container and coloring it (one little drop of blue gel for about 1 1/2-2 cups of white icing), I thinned it down with a little water to make it more spreadable. There's no real formula to this - just add a couple teaspoons of water at a time and keep stirring until you reach the desired consistency.
Then I just spooned the icing on and spread it around a bit until the entire cookie was covered. Like I said, I don't mind it if the icing goes off the edges.

Another word of warning: there is such a thing as thinning your icing out too much. I glazed about 6 cookies (and sprinkled them with edible glitter), then watered down my icing a LOT more to glaze the rest. I foolishly (and lazily) thought it would be faster if I could pour the icing instead of spreading it around with a spoon. Well because of all the moisture in the icing, this decision cost me an extra TWO DAYS in drying time. Gah! They were so tacky after the second day that I honestly thought they were never going to dry, and I almost threw them all in the trash. Have I mentioned that I'm a bit of a perfectionist when it comes to these things?
Anyhow, they did eventually dry, and this is why it's a good idea to start way ahead of time. The extra water also gave the icing a more shiny and translucent look which I wasn't particularly fond of. Here are the two different versions, side by side:
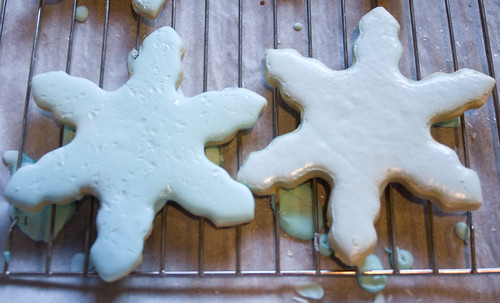
The cookie on the left also has some edible glitter that I sprinkled on while it was still wet. I let the clerk at the store convince me that it would be pretty, but I was rather unimpressed by it. I probably won't use it again unless I'm going to use a LOT all over the entire face of the cookie.
I'm running short on time today, so I'm going to go ahead and post, and I'll show detailing and finishing touches in part 3. :)
No comments:
Post a Comment