Thursday, June 17, 2010

Weekend breakfast

When I was a kid, my mom used to occasionally make crepes for the family on weekends.  I never thought it was unusual until we had guests who "oohed and aahhed" over such a fancy breakfast.  But crepes really aren't all that hard to make.  It's more or less the same as pancakes, you just cook them one at a time in a smaller pan.  I'd say the hardest part is waiting the 30 minutes for the batter to rest.  With Father's Day coming up, I figured what better way to show your appreciation than to give him a special fancy breakfast. ;)

Here is the  recipe I used for the batter, from Crepes, Waffles & Pancakes! by Kathryn Hawkins:

Basic Crepe Batter
Makes 12 crepes

Ingredients
1 c. plain flour
2 Tbsp. extra-fine sugar (optional)
1 pinch salt
2 whole eggs
2 egg yolks
1 1/4 c. milk
1/3 c. unsalted butter, melted

Directions
1. Combine the flour, sugar  (if using), and salt in a bowl.  Make a well in the center, break in the eggs, then add the extra yolks.  Add half the milk and gradually work into the flour using a whisk.  Beat lightly until smooth, but don't over-mix.

2. Add the remaining milk gradually, whisking gently until it is well combined.  Transfer to a batter bowl, cover loosely and leave in a cool place for 30 min.  Stir 1/4 c. melted butter into the batter before using.

3. Lightly brush a small frying pan (6-inch diameter) with a little of the remaining butter and heat until hot.  Holding the pan, pour in about 1/4 c. batter and tilt the pan from side to side so that thte batter runs into a thin, even layer across the bottom of the pan.

4. Place the pan over moderate heat and cook for about 1 minute or until the crepe browns around the edges and begins to curl away from the pan.  Slide a palette knife under the crepe and flip it over.  Brown the underside for a further minute.

5. Turn out onto a wire rack lined with a clean tea towel and baking parchment.  Fold the paper and towel over the crepe to keep it moist.  Continue to make further crepes, brushing the pan with melted butter as necessary, gently stirring the batter each time it is used, and stacking the cooked crepes between sheets of parchment until you are ready to serve.

My Notes
I did not bother with extra-fine sugar.  I used regular granulated and it seemed to work out just fine.  I also think that they took a bit longer than a minute for each side.  Oh and this made closer to 14 or 15 for me, but I probably could have made them bigger.

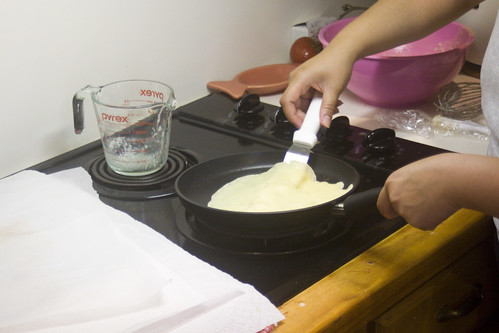
I got a fancypants crepe pan for Christmas last year, but any small nonstick pan will work just as well.  I also used a large offset spatula to lift and flip the crepes.  I found that was a bit easier to use than a regular wide spatula.

 To keep them warm, I stacked them on a plate in the oven with layers of parchment in between and a clean tea towel over the top.

IMG_1449 by you. 
IMG_1452 by you.


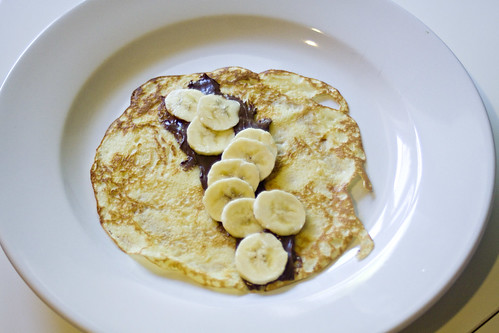
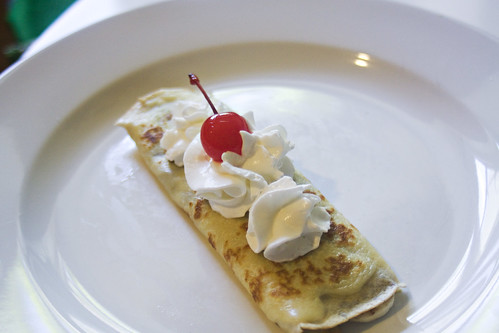
The thing I loved the most about crepes is that you can set up an assembly line of fillings and everyone can make their own.  You can do savory or sweet, healthy or not-so-healthy, fancy or plain. ;)  I set out everything from bananas and nutella (my fave) to crushed pineapple and whipped cream to just plain old strawberry jam.

IMG_1436 by you. 
IMG_1438 by you. 

I thought I was going to have enough leftover to try to make Crepes Suzette later, but these were all gobbled up in one sitting!

Friday, May 14, 2010

Shameless plug

Sorry for the lack of posts lately.  I've been busier than usual as of late.  But I promise I have a great weekend breakfast/brunch post coming up soon!  In the meantime, here's a link to a guest blog I wrote for Momtrends.  It includes my world-famous recipe for "Kitchen Sink Cookies."  Ok, maybe not world-famous, but they're pretty famous in our household.  Troy has declared them his favorite cookies ever, which is high praise coming from someone who likes cookies as much as he does. 

If you enjoy the post, please leave a comment! ;)

Sunday, April 11, 2010

Abacus

Yikes, has it really been almost 2 months since my last post?  Sincere apologies, as the month of March was a bit crazy, and then, well...I guess I just got a bit lazy about catching up.  To make up for it, here's another restaurant review.

For my birthday last month, Troy took me to Abacus for dinner.  We've always heard fabulous things about it but had yet to go there, so I was very excited to try it. 

We got there early so that we could relax and have a drink at the bar.  Troy had the "Big Daddy" martini and I had the pear martini, which was fabulous.  Sweet and tart, but not too much so.  I think I could have easily drank 2-3 or them.  But I downed that first one a little too quickly and opted against another for fear of being too drunk to enjoy my food. 

After Troy made the reservation, I had perused their sample menu online and was pretty certain that I wanted to do the 9-course tasting menu.  A bunch of friends had raved to me about the lobster shooters there, which I really wanted to try, but ultimately, we decided against it because we knew it was just going to be too much food.

Normally, I feel too self-conscious to take pictures, and I also don't like having to disrupt our meal and conversation either.  But for some reason, I decided to bring my camera this time, just in case I felt like using it.  I used my 50mm lens, because it was the smallest and also because  I refuse to use flash in those situation.   I just quickly snapped one photo of each course before digging in.  So some of these may be dark, slightly out-of-focus, etc.  Sorry.

Troy and I both really liked the ambiance there: modern without being too trendy and weird, and not so loud you couldn't have a conversation.   Each table was individually lit so you could see your food (I hate eating in the dark), but the room wasn't so bright overall as to be overwhelming.  It had a nice sense of privacy, but then, we did sit in the corner, so not sure what it would have been like sitting elsewhere.

So as I mentioned above, we opted for the nine-course tasting menu.  Many were mini versions of menu items.

No amuse bouche, which I left me a little disappointed. :(

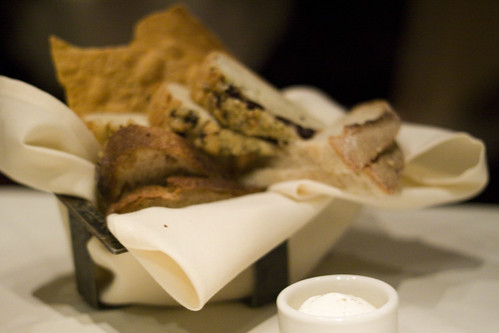
IMG_1227 by you.
Artisan bread basket - rosemary olive foccacia, apricot wheat(?) bread, sourdough, mini biscuits, and what I think were cayenne flatbread crisps or crackers.  Clearly made in-house.  Or if it wasn't, I want to know where they bought it all because it was fabulous.  I'm not normally a fan of olives, but they were really delicious chopped up on top of the foccacia.  The only real miss for me were the mini-biscuits, which were a bit bland and seemed like they didn't really belong there.  Pretty sure the butter was homemade as well.

1st course: Tuna tataki in ginger-scallion ponzu sauce
 IMG_1226 by you.
Lightly seared tuna, totally rare inside, thinly sliced and arranged in a circle.  The sauce was beautiful - perfectly salty and tangy and just the right amount of ginger - and really complimented the flavor of the tuna.  One of our favorite dishes of the evening.

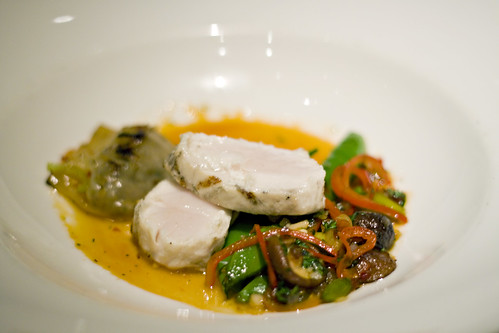
2nd course: Hawaiian walu fish in chili lemongrass sauce/broth with Kobe beef mini-dumpling, baby shitake mushrooms, sugar snap peas, & red peppers
IMG_1228 by you.
Troy and I thought this was the best dish of the evening.  The fish was cooked absolutely perfectly, the veggies were a good complement, and the sauce was amazing - tangy & slightly spicy.  I thought the Kobe dumpling was a bit of an odd addition since the richness of the beef threw off the lightness of everything else.  Troy didn't have a problem with it.

3rd course: King salmon on pepper jack grits with jicama slaw, pepita pesto and cayenne tomato butter sauce
IMG_1229 by you.
This was also excellent.  Again, the fish was cooked perfectly.  I thought the cheesy grits would be weird with the salmon, but the flavor wasn't so overwhelming and I liked the contrast of textures.  I also liked that the slaw had strips of tortilla chips in them, which gave ti a nice crunch. 

4th course - Sangria sorbet with a golden raspberry (forgive the extreme lack of focus)
IMG_1230 by you.
I thought this was a bit of cheat, calling a palate cleanser the fourth course.   The flavor was nice, very much like sangria, although it was a little bit sweet for my taste, especially after being dusted with powdered sugar.  Also I hate to nitpick, but the texture was a lot rougher than what I'd expect from a sorbet.  I'm not sure if the runner who served this mis-spoke or not, but I'd say it was more like granita.

5th course: Seared foie gras over duck confit blintz with madagascar vanilla sauce
IMG_1231 by you.
This was my other favorite dish of the night.  The foie gras had a gorgeous seared crust to it which really gave it a nice texture.  I was a bit wary about the vanilla sauce since I generally feel like vanilla belongs in dessert, but it actually went nicely with the richness of the foie.  There was another flavor in the sauce that I couldn't quite make out.  I thought it was pear, but it turned out to be granny smith apple!  The duck blintz was also very good, but I thought it didn't go as well with the sauce.

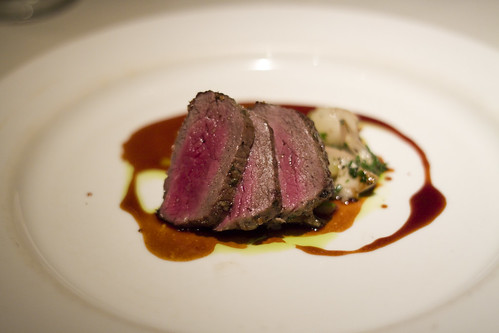
6th course: Venison with butter poached potatoes, pearl onions and duck(?) confit
IMG_1232 by you.
On this dish, my memory has failed me a bit.  This had a lovely sauce on it, but I cannot for the life of me remember the description.  I want to say it taste like some kind of wine reduction, but I could swear that the server said something about cherries.  Also, I'm fairly certain that he also told us this had duck confit, however the version on the menu said rabbit.  We weren't entirely sure, even as we were eating it. 

Again, this was beautifully cooked.  I can't say there was anything wrong with this dish, but it didn't really knock my socks off and make me want to lick my plate.  The butter-poached potatoes were probably my favorite part.  Also, they were a little inconsistent in plating as I had WAY more confit on my plate than Troy.  I think he also had cherry tomatoes on his plate, and I did not.

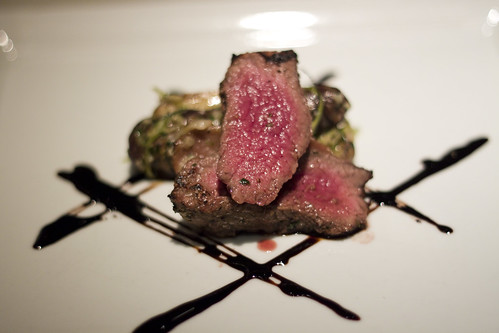
7th course: Antelope with Gorgonzola fingerling potatoes, demi glace sauce
IMG_1233 by you.
I loved the gaminess of the meat, and the contrast of the sauce to cut the richness, but the potatoes were weird.  I absolutely hated the gorgonzola - it was way too overpowering.  I also found it odd that each of my three potatoes was different.  I'm not sure what I was supposed to get out of that.


8th course - cheese course
IMG_1234 by you.
Again, apologies for my failure to write down the names of all the cheeses.  Basically, the only one I really remember is the semi-soft pictured to the left was a Chimay.  On the right was an aged cheddar, and in the center, a blue cheese.  The cheeses were served with a small tumbler of wildflower honey, quince gelee, spiced nuts, artisan bread crisps, and thin slices of apple.

I really enjoyed this course.  All of the cheeses were quite different and delicious.  I also really liked the cubes of quince gelee.  I do wish there were a few more bread crisps though.

9th course - Dessert
 IMG_1237 by you.
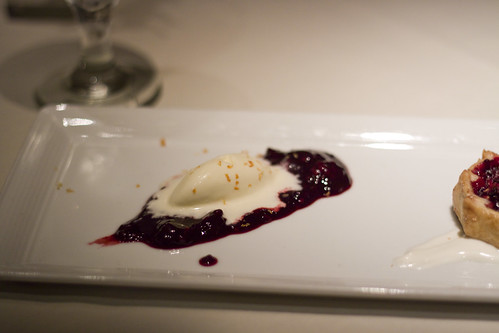
Berry galette with goat cheese crema and lemon curd ice cream over mixed berry sauce
We were told this was a bit off the usual tasting menu; apparently these was made as testers for a dessert special but were too small, so they gave them to us instead of the nutella & kitkat concotion we were supposed to get.  I was very glad for it.


I loved the galette, especially with eaten in conjunction with the goat cheese crema underneath.  In fact, I wish there had been a little bit more of that.  The ice cream also very good but was already almost totally melted when it was served. :(

IMG_1235 by you. 

All-in-all, this was a very good meal that fell just short of being great.  I felt like every dish had one element that just didn't belong there, like the beef dumpling, or the Gorgonzola cheese.  Troy says I'm overcritical, but my big hangup is that everything should all taste good together.  So if you put a bunch of different items together on one plate, I should be able to put a little bit of each item on my fork, take one bite and not be like, heh? Is that too much to ask?  

I was a little bit surprised that with all the sushi on the menu, there wasn't any sushi as part of the tasting menu.  However, I will say that the seafood courses were far and away the strongest part of the menu.  

They do have happy hour specials, so I'd definitely like to go back sometime to hang out at the bar and nibble on appetizers. 

Saturday, February 13, 2010

Craft Dallas

With my mom in town for a visit last week, the hubby and I decided to take advantage of free babysitting and celebrate our anniversary a little early.  We usually try to go someplace nice and this year we settled on Craft.

Craft Dallas is located inside the W hotel, right across from Victory Park.  I have to confess, Troy and I are rather woefully unhip, especially after being sequestered in the 'burbs with a kid for the past 3 years, so it was a little bit of a culture shock to go to the W, which is fairly trendy hipster-y.

I was pretty shocked to find that the place was almost completely dead.  Our reservation was for 7:30 and there were only maybe 4-5 other tables seated.  I have no idea if that's normal for a weeknight or not, but I figured there'd be a few more people out and about on a Thursday.  It was pretty weird, but not totally unpleasant.  Just...odd.  The ambience was otherwise just fine.  Inside, it was pretty dark, but not so dark you couldn't see your food. 

The entire menu is pretty much a la carte, and everything is served family-style, in the center of the table.  There is an option for a "Market Menu" which is $45/person and you get to choose from a 3-4 different options for a starter, main & side dish.  We briefly considered it, but ultimately opted not to do it because A. the whole table has to do it; B. there weren't all that many options, especially for starters; and C. it didn't seem like very much food.  We figured that if we went to the trouble to get all dressed up for a night without the kid, we may as well do it up in style and really EAT!

Here is what we ended up having.  (Sorry, no pics again.  It was way too dark for my camera phone and I hate ruining the ambience at a nice restaurant with flashbulbs.)

Bread
While we were still mulling our options, they brought out a bread course, which consisted of thick slices of a dark, rye-ish bread, an Italian-style bread with sesame seeds, and salted butter.  Both breads were very good, but were not baked in-house.

Amuse bouche:
Butternut squash & foie gras soup, served in small white ceramic cup, almost like a shot glass. Soup was garnished with couple drops of balsamic and toasted pine nuts.  Even though you couldn't really taste the foie gras, it had a very rich taste to it, almost like a bisque.  Texture was perfectly smooth and creamy.

Starters:
Half dozen oysters, half one kind (buttery), half another (briny) - sorry, I've forgotten the names.  Served with tiny lemon wedges and mignonette sauce.  We ordered these on a whim since I had just been saying how long it's been since I've eaten oysters.  They are sold individually, which is why we decided to mix it up a bit.  I loved the buttery oysters, Troy loved the briny ones, so it worked out perfectly.  I preferred the lemon over the mignonette.

Seared foie gras & pineapple.  Troy had never had foie gras before, so we decided to try this one out.  We chose this version over the torchon because we thought he might prefer the texture of seared.  It was served with a pineapple puree and small chunks of pineapple.  I liked the contrast of the tangy pineapple and the creamy/rich foie gras.

Baby spinach & applewood bacon salad.  It also had pickled red onions and some kind of creamy/sweet vinaigrette.  I know this sounds ridiculously simple, but it was SO delicious!  One of our favorite dishes of the evening.

Main courses:
28 day dry-aged NY strip (21 oz, bone-in).  Served with some kind of red wine demi/reduction sauce, giant rosemary sprig on top; served sliced.  This was excellent.  Absolutely perfectly cooked - beautiful sear on the outside, medium-rare throughout the entire center.  In fact, the inside was so perfectly even that Troy and debated whether it had been cooked sous-vide first.  Sauce was a tiny bit over-reduced, but otherwise a perfect complement to the meat.

Diver scallops, seared and served with some kind of brown butter sauce.  Again, these were absolutely perfectly cooked.  They melted like butter in your mouth.  And I wanted to take a bath in the sauce. 

Sides:
Sauteed baby broccoli.  This was good, but not my favorite of the evening.  It was more like broccolini than broccoli, which is technically different.  It had a small squeeze of lemon over it that was nice.  And again, it was perfectly cooked.  Nothing worse than overcooked broccoli.

Gnocchi, served in creamy butter sauce.  This was absolutely TO DIE FOR.  I absolutely love gnocchi and this might have been the best I've ever had.  Perfectly soft and tender and melt-in-your-mouth perfect.  Sauce was creamy and rich with a tiny bit of cheese sprinkled in there.  Troy and I both agreed that we would easily drive down there just to eat plates of gnocchi. I think this was our top dish of the night.

Dessert:
We were pleasantly surprised to get a little dessert amuse of pear slices with lavender caramel.  I'm not normally a fan of lavender in my food (it usually feels like I'm eating potpourri), but it was subtle enough to still be enjoyable.

Sticky toffee pudding, with caramelized pecans and clotted cream.   We had a hard time deciding on dessert, but this turned out to be the perfect choice.  It was served in a cup, almost like a parfait.  Rich and gooey, with a nice bit of crunch from the pecans, and the clotted cream (mostly on the bottom) cut the sweetness nicely.

Maitre'd course: This consisted of six tiny little mini-cookies - two each of salty peanut butter, oatmeal raisin, and double chocolate.  The chocolate was almost brownie-like in texture, very rich.  And the peanut butter was very interesting in that it had almost no sugar in it.  I normally like salty-sweet combos (salted caramel is a fave), but this was only salty, which was a bit odd.  I think I would have liked it better if I hadn't eaten it first - it would have been a nice contrast to the chocolate cookie.  Oatmeal cookie was good too, with a nice brown sugar crunch to it.

Last, but not least they gave us a little take-home treat in clear cellphane bags.  I'm fairly certain our server told us it was an espresso muffin, but when I ate it the next morning it was actually a banana chocolate chip muffin.  It was good, but I'm not sure where that there was any espresso in it at all.

All-in-all, this was a very very good meal.  Nothing crazily inventive like our L2O meal, but simple, straightforward cooking, done at a high level.  Amazing how something that seems so simple as proper cooking can make such a difference.

Service was very attentive.  I don't know if this is the norm or just because it was a slow night but I think we had no less than 3 different servers or bus boys coming by to check on us, but it was never intrusive or annoying.  My one minor complaint was that they served our entrees while Troy was away from the table.  I know it's probably not a big deal to some people, and if we were at some random Tex-Mex joint, I wouldn't care.  But in my opinion, this is a faux pas at a high-end restaurant.  Luckily, he came back very shortly thereafter, while the food was still hot.

I've heard some people complain about leaving Craft still hungry.  Troy and I were a little baffled by this because we left absolutely stuffed.  But I will confess that some of the entree portions can be a bit small.  Those diver scallops?  There were only 4 of them.  If we hadn't also ordered the steak, those 4 scallops definitely would not have cut it as an entree for one person.  So you may want to put a little thought into how you mix and match your entrees.

However, it's an a la carte menu, so if you're a big eater, you'll need to order more food.  Yes, it's pricey, but if you're already dropping a pretty penny on the meal, it seems silly to cheap out on spending another $10-$20 for an additional starter or a side.  

This meal probably ranked as one of our top 10, mostly based on the fact that everything was cooked so perfectly.  I love the philosophy of not getting overly fussy with your food and letting the ingredients shine on their own.  Based on our usual dining budget, Craft is going to be best reserved for special occasions, but I think it's safe to say that we'll definitely going back.  I do have a birthday coming up soon, hmmm....

Friday, February 12, 2010

Fudge puddles

IMG_0527 by you. 


I've been dying to make these ever since my friend Abbie posted them on her website, The Green Wife (she has lots of great stuff there - recipes, crafts, giveaways, etc).  I mean, who doesn't love peanut butter and chocolate together, right?

Well with the big snowstorm here in Texas, we were more or less housebound today so I decided to give it a whirl.  They're a teeny bit labor intensive, but totally worth it.  These cookies were absolutely fabulous, bordering on sinful.  I'm actually almost glad that I waited so long to make them because they are crazy addictive too.  I don't know if she mentions it on her site, but the recipe makes a TON - I ended up with about 8 dozen.

I made it pretty much exactly as written with the exception of the fact that I halved the salt.  I figured that with all that peanut butter, it'd be plenty salty already.  I also recommend waiting until you've finished baking all the cookies before you make the fudge filling.  I made mine too early and after a while, the fudge cooled and set a bit and didn't look as pretty after being scooped and filled.  They still tasted the same, I'm just obsessive about things being pretty. ;)

Check out the recipe here.  And don't say I didn't warn you!

Monday, February 8, 2010

Lemon cake

IMG_0201 by you.


This is one of the very first recipes that I came up with totally on my own, from scratch.  I'm not generally one to brag, but I will say that this cake usually earns raves whenever I make it.  It was inspired by the store-bought packages of sliced lemon cake my brother and I used to eat as a kid.  That stuff was a frightening shade of neon yellow but it was super lemony and I don't think I've had a cake since that had the same intense lemon flavor (although I'm sure if I went back home and ate it now, I'd find it nasty).

There was a lot of trial and error involved in coming up with this recipe, and I still tweak it from time to time, especially if I don't have all the ingredients I need on hand.   You always hear a lot about how baking is a science and requires precision.  Well, that's only really half-true.  Sure, there are certain formulas that generally need to be followed, but I think that once you know the basic rules of how ingredients interact, it's much easier to experiment. 

I usually let my daughter help me measure and pour in ingredients, which sometimes leads to unintended variations.  This time, she spilled most of an egg white on the counter but still managed to get the yolk into the mixer bowl.  I was actually quite pleased with how it turned out, so here is the version we made. ;)

Ingredients
1 c. butter, softened
1 1/2 c. sugar
2 whole eggs, plus 1 yolk
1 lemon, zested & juiced (1/8-1/4 c)
1/2 tsp lemon extract
2 c. all-purpose flour
1 tsp baking powder
1/4 tsp salt
1 c. milk*

Directions
1. Preheat oven to 350 degrees.  Grease a bundt pan with butter or spray oil.

2. In a small bowl, combine flour, baking powder and salt.

3. In the bowl of stand mixer, cream butter and sugar with paddle attachment until light and fluffy.  Add eggs, one at a time, and mix till combined.  Scrape down the sides and bottom of the bowl with a spatula after each addition. Stir in the lemon zest and lemon extract.

4. Alternate adding the flour mixture and milk in 2-3 parts, each time mixing until just barely combined.  Scrape down sides and bottom of bowl to make sure everything has been incorporated.  Add lemon juice and stir to combine.  The batter may look a little curdled, but that's ok.

5. Bake for 40-50 minutes or until a toothpick inserted in center comes out mostly clean.  Cool in pan for about 15-minutes, then turn out onto wire rack to cool completely.

6.  Drizzle with lemon glaze (recipe below) and serve.

Lemon glaze:
In small bowl, combine 3/4 c. powdered sugar and 2-3 Tbsp of lemon juice.  Whisk until there are no lumps.  Glaze should be about the consistency of syrup.  To thicken, add more powdered sugar.  To thin, add water a few drops at a time until it reaches desired consistency.

*I normally prefer to use whole milk when baking, or sometimes half & half or heavy cream.  I've even used sour cream for this recipe when I've been in a pinch.  I didn't have any of those on hand this time, so I just used good old skim milk.

Wednesday, January 13, 2010

Red-braised beef

IMG_12581 by you.


I actually made this a couple weeks ago, for New Year's Day, but I haven't had a chance to post about it till now.  Chinese "red-braised" beef is one of my ultimate comfort foods.  My grandmother use to make the best I have ever tasted, although my mom's is pretty darn good too.  I had my grandma teach me how to make this and a few other favorite dishes a number of years ago, following her to the grocery store and attempting to keep track of her measurements.

It's basically a large, tough cut of beef braised in a mixture of soy sauce and other liquids until tender.  The soy sauce is what gives it the "red" color (although some will argue it's really brown, but whatevs).

Even with a pressure cooker, this dish is pretty time-consuming, so it's best cooked at least a day ahead of time.

Ingredients
3-6 lbs beef boneless shank or chuck (or combination of the two), left in large pieces
1 lb beef tendon (optional)
1/2 c. soy sauce
1/4 c. dark mushroom soy sauce
1/4 c. Chinese rice wine (can also substitute mirin or even whisky in a pinch)
 3-4 cloves garlic
3 scallions, cut into 3-4 pieces
4-5 whole star anise pods
1/2 tsp whole Szechwan peppercorns
1/4 tsp black peppercorns
Up to 1/2 c. water, as needed


Directions
1. In a large pressure cooker, add all ingredients.  If you like, you can tie up the star anise and peppercorns into a small sachet of cheesecloth or put them in a tea ball to make it easier to fish them out later.  However, you'll be straining the liquid at the end, so it's not completely necessary.  The liquid in the pot should come about halfway up the level of meat.  Add water, as needed, but try not to add more than 1/2 cup.

2.  Close the lid and heat according to you pressure cooker directions.  Pressure-cook for 1-2 hours, until meat is very tender, almost (but not quite) falling apart.  If you're also using the tendon, that may take longer, so you may need to remove the meat and keep cooking the tendon separately.  Alternately, if you don't have a pressure cooker, you can do this in a large Dutch oven over low heat for 3-4 hours.

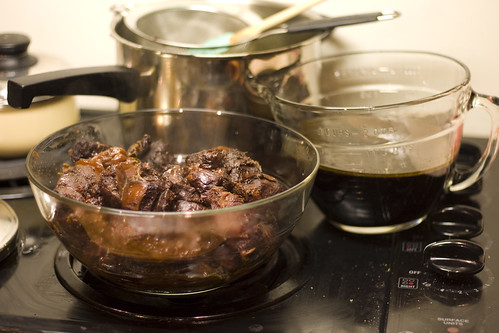
3. Once everything is cooked, separate the meat & tendon from the liquid, and then strain the liquid into a large measuring cup or bowl.  The amount of liquid you end up with vary, but I yielded roughly a quart of liquid from 6 lbs of meat.  You will likely have much less if you did not use a pressure cooker.


IMG_12491 by you.


4. If you have the time, cool the liquid down in the refrigerator or freezer until the fat separates and solidifies.  Skim this fat off and discard.The meat and tendon is also much easier to handle if you allow it to cool for several hours, covered, in the refrigerator.  I usually wait until it is cooled, cut only what I'll need into 1/4-1/2 inch slices, then reheat.

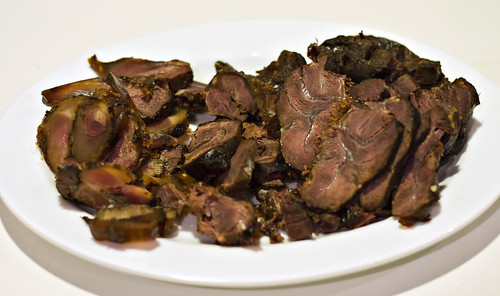
Here's a pic of the meat and tendon, after it has been sliced.

IMG_12568 by you.

 The meat and liquid also freeze well separately.  My mom used to freeze the liquid in plastic storage containers and then transfer the blocks to ziploc bags. Once defrosted, it makes for a quick easy dinner.


Once your meat is cooked, there are a number of different things you can do with it. The most common is to make beef noodle soup by take the cooking liquid and turn it into a broth, and then adding beef and noodles.  It's sort of like Vietnamese pho, but with different flavor profiles.

To make the broth, pour 2 cups braising liquid into a large stockpot.  Add 1 quart of low-sodium chicken stock (I use Pacific Natural Foods organic chicken broth).  Don't worry, the liquid has plenty of beef-y flavor and you'll never know the difference.  Add one can of diced tomatoes (liquid and all), and bring to a boil.  Add about 1/2 cup of chopped scallions just before turning off the heat.  You can also add napa cabbage or fresh spinach to the soup, if you want to get a little veg in there.

To serve, place your desired amount of freshly boiled Chinese noodles and sliced meat in a large bowl.  Ladle the hot soup over it and eat immediately.

You could also make green onion pancakes and serve the meat with that.  I've previously posted the recipe on my other blog.

Notes
I know that 3-6 lbs of meat sounds a bit broad, but it's the same amount of work to make 3 lbs as it is to make 6 lbs, so it doesn't hurt to make extra and freeze half. I usually cook somewhere around 3-4 lbs of meat.  I realize that still sounds like a lot, but it does cook down quite a bit and we don't mind leftovers around here. ;)  This was the first time I made 6 lbs because I was feeding six people instead of three, and we definitely had plenty to spare.

Also, I'm sure a lot of you read "tendon" in the ingredients list and made a face.  But honestly, that's probably my favorite part of this dish.  It's definitely not for everyone since the texture, once cooked, is fairly gelatinous, but if you can get past that, it's really fabulous. You'll more than likely have to go to an Asian grocery store to find it though.  In the past, I've gone to meat markets and asked about it only to have butchers look at me all cross-eyed.

As for the other cuts, I also bought large, 2-lb pieces of beef shank at the Chinese grocery store, but if you can't find those, the smaller, bone-in cross cut pieces you find at the regular grocery store will work.  Or a large chuck roast is good too.

Tuesday, January 12, 2010

Whole-Wheat Pita Bread


IMG_12608 by you.


I randomly decided I wanted to try to bake some pita bread today.  Well, not totally randomly.  I actually wanted to make naan, but as I was searching through The Bread Bible by Beth Hensperger for a recipe (sadly to no avail), I came across this recipe for Country-Style Whole-Wheat Pita Bread and decided to try that instead since I already had all the ingredients for it.

Ingredients
2 1/2 c. warm water (105-115 degrees), divided
1 Tbsp (1 packet) active dry yeast
pinch of sugar
1/4 c. olive oil
1 Tbsp salt
3 c. whole-wheat pastry flour
3-3 1/2 c. unbleached all-purpose flour

Directions
1. Pour 1/2 c. warm water in a small measuring cup, and sprinkle in yeast & sugar.  Stir to dissolve and let stand until foamy, 5-10 min.

2. In a bowl of a stand mixer, combine whole-wheat flour, salt, olive oil and remaining 2 c. of water.  Mix on med-high with the paddle attachment until creamy, about 1 minute.  Stir in yeast mixture.

3.  Add the all-purpose flour, 1/2 cup at a time until a soft shaggy dough that just clears the sides of the bowl is formed.

4. Switch to dough hook and knead for 2-3 minutes, or until the dough is smooth and springy and springs back when pressed.  Or if you prefer, transfer the dough to a floured surface and knead by hand.  Dough will be very soft.

5. Place the dough in a lightly-greased, deep container or bowl.  Turn the dough so that it is coated with oil on all sides.  Cover with plastic wrap and let rise at room temperature until doubled in size, about 1-1 1/2 hours.

6. Preheat the oven to 475 degrees with a baking stone set on the bottom rack. Line several baking sheets with parchment paper, or heavily flour a pizza peel.

7. Gently punch down the dough and divide it in half.  Keep whatever dough you are not working with covered with plastic wrap or a clean towel to prevent a skin from forming.  Divide each half into 8 equal portions and form each into a ball.  Let rest 10 minutes while dividing the second half of the dough.

8.  Dust the work surface with whole-wheat pastry flour.  Using a rolling pin, roll the balls into 6-inch circles about 1/4-inch thick.  Loosely cover the circles and let rest 15 minutes, or until puffy.
Do not stack, as they will stick together.  If the dough does not roll out easily, let it rest for 10 more minutes to relax the gluten.  Move the dough circles by draping them, one at a time, over a flour-dusted rolling pin and place them on a floured dish towel before transferring them to the peel or baking sheets.

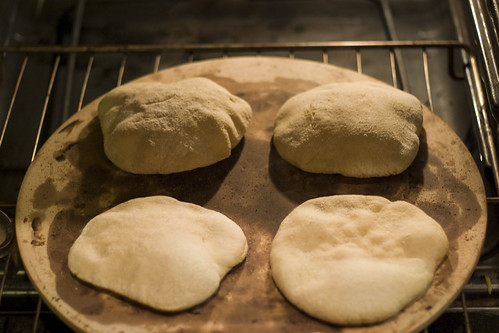
9. Transfer the circles to the peel or baking sheet.  With a quick action of the wrist, slide the pita rounds from the peel directly onto the hot stone.  You should be able to fit 4 at once.  Or alternately, place the baking sheets (one at a time) on the bottom rack directly on the hot stone.  Do not open the oven door for a full 4 minutes.

10.  Bake 8-10 minutes, total, or until fully puffed and light brown.  Watch carefully that the pitas do not overbake or burn.  The baking sheet pitas will take longer to bake than the stone-baked ones.  Remove the puffed hot breads with a wide metal spatula and stack between clean dish towels.
Makes 16 pitas.


IMG_12615 by you.


Notes
These were fantastic, especially right out of the oven.  My daughter wolfed down a whole one by herself, plain. 

I made this recipe pretty much exactly as written - don't ask me why I happened to have whole-wheat pastry flour on hand, I have no idea.  Also, I'm not sure why she says to use one package of yeast or 1 tablespoon - I've always been under the impression that at package of yeast is 2 1/4 tsp (so 3/4 tsp shy of a tablespoon), but I went with the tablespoon measurement.  Which reminds me to mention something: if you make bread or pizza dough or anything with yeast even semi-regularly, it's really in your best interest to just buy a jar of active-dry yeast instead of the packets.  It's WAY cheaper.

However, when I baked the first few, I had missed the step of letting the rolled-out pitas rest 15 minutes so they did not puff up.  They still tasted great, they just didn't have pockets in the middle.  All the subsequent ones turned out fine.

I also forgot to set my timer for one batch and I think I horribly overbaked them, but after cooling a bit in the dishtowel, they were fine.  I will say, with the whole-wheat flour, it's a bit difficult to tell the doneness by color, as advised in the recipe.  But I really liked the flavor the whole-wheat flour added.  I think using the pastry flour was key - a lot of regular whole wheat flours I've used before tend to be coarser, which would definitely have affected the texture.


A few warnings:
1. You're going to need a lot of open surfaces or counter-space to do this.  Even if you don't roll them all out at once, you'll probably have 4-8 pitas sitting around and resting at any given time before being baked.
2. You will more than likely end up with a fine layer of flour covering most of your kitchen.
Neither of these things was a big issue for me, but I just thought I'd put it out there.
3.  I'm not sure I'd bother to attempt this recipe without the baking/pizza stone.  I know it seems like a pain to get one, but it's really a wonderful tool.  It makes even store-bought frozen pizzas taste worlds better.  You can usually find them for $10-$20 and they are worth every penny.

Oh also, the author did have a note in her recipe that these stale rather quickly, but toast nicely, so you may want to freeze a bunch if you don't think you'll use them all in the next few days.  After cooling them completely while still wrapped in towels, I put them in two ziploc bags, and I'm going to freeze one bag for later.  I'll update with how well they freeze & reheat when I get a chance.

Or alternately, she suggests you make pita chips with them:
Brush both sides with olive oil, cut each round into wedges and place in a single layer on a baking sheet.  Bake in the center of a 300-degree oven for 7 minutes, turn once and cook for another 7 minutes.  They will crisp as they cool.

Thursday, January 7, 2010

Hot pot


IMG_12597 by you.

I've been making fun of the dire weather warnings for the ARCTIC BLAST all week, but I have to confess, it really did get pretty dang cold!  I thought I moved to Texas to get away from phrases like "wind chill," dammit!

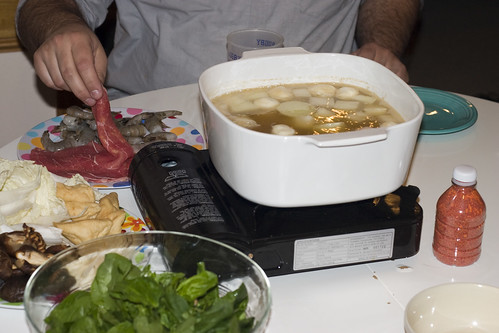
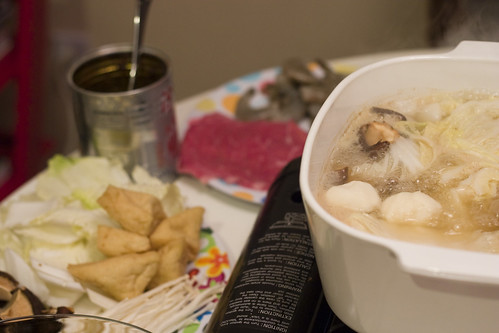
In any case, the cold weather was a nice excuse to fire up the camp stove and eat hot pot (huo guo), also known as shabu shabu.  I have very fond childhood memories of sitting around the stovetop on our kitchen island and eating this on cold, wintry nights.  I actually did a post about it last year on my other blog, but here are a few pics from tonight's dinner.

IMG_12593 by you.


IMG_12598 by you.


Tonight's version included eye of round, shell-on shrimp, fish & shrimp balls, napa cabbage, spinach, fried tofu, enoki & shitake mushrooms, and daikon radish.  I also had mung bean thread noodles soaked and ready to go, but we were so full by the end that no one could eat any.

Saturday, January 2, 2010

Chocolate-Sour Cream Bundt Cake


 IMG_12511 by you.


Have I mentioned that I love the new bundt pan I got for Christmas from my lovely sister-in-law?  It's not often that I will bake twice in the same day, let alone using the same pan, but I couldn't resist trying out the recipe that came on the back of the box last night.

You can also find a slightly different, scaled-down version of this recipe on the Williams-Sonoma website that's geared towards fitting a 10-cup pan.  It leaves out the chocolate chips and uses a glaze in lieu of ganache. I think it's probably pretty close to this recipe, but having never made it, I can't vouch for it.


Ingredients
1 c. non-alkalized cocoa powder, sifted; plus more for dusting pan
7 1/2 oz. semisweet chocolate, finely chopped
1. c boiling water
2 1/4 c. all-purpose flour
1 1/2 tsp baking soda
1 1/4 tsp kosher salt
2 1/2 sticks unsalted butter (room temperature)
2 1/2 c. packed light brown sugar
5 eggs, lightly beaten (room temperature)
4 tsp. vanilla extract
1 1/2 c. sour cream (room temperature)
1 1/2 c. semisweet chocolate chips

Directions
1. Preheat oven to 325 degrees.  Grease a large bundt pan and dust with cocoa powder, tapping out excess.

2. In a small bowl, combine the cocoa powder and 7 1/2 oz chocolate.  Add boiling water and whisk until the chocolate melts and the mixture is smooth.  Set aside to cool.

3. In a separate bowl or over parchment paper, sift together flour, baking soda and salt.

4. In the bowl of a stand mixer, cream the butter and sugar together until light and fluffy.  Add the eggs a little at a time, stopping occasionally to scrape down the sides of the bowl.  Add vanilla and beat in.

5. On low speed, alternately add the flour mixture and the sour cream in 3 parts, beginning and ending with the flour, beating until just combined.  Slowly pour in the chocolate-cocoa mixture and beat until no white streaks are visible, occasionally stopping the mixer to scrape down the sides and bottom of the bowl.  You want to mix until no white streaks are visible.  Then, using a rubber spatula, gently fold in the chocolate chips.

6.  Pour the batter into the prepared pan, spreading the batter so that the sides are about 1-inch higher on the sides than in the center.  Bake until a toothpick or skewer inserted in the center comes out mostly clean, approximately 60-70 minutes.

7. Transfer the pan to a wire rack and let the cake cool upright in the pan for 15 minutes.  Invert the pan onto the rack and lift off the pan.  Let the cake cool completely, at least 1 hour.

Notes
This recipe makes a LOT of batter.  Seriously, a crazy amount.  Like, it filled most of my mixer bowl, most of my 15-cup bundt pan, and puffed up and over it during baking.  You either need to have a BIG bundt pan to make this, or be prepared to make cupcakes on the side.

I made a few very minor changes.  I didn't have enough cocoa powder left to dust my pan, but it didn't end up being an issue since my fancy new pan is still super nonstick.  I did, however, substitute white sugar for a cup of the brown since I ran out.  And I used regular old table salt instead of kosher, which I find to be a pain to measure as accurately.  The original recipe also called for you to return the cooled cake back to the pan so that you could "gently saw off" any excess than extended over the edge of the pan and have a level bottom, but honestly, I didn't bother.

Also, when it says to scrape down the sides (steps 4 & 5), make sure you do a thorough job.  I thought I had, but when it came time to pour the batter into the pan, I found a pool of batter at the bottom that had not been mixed properly with the chocolate mixture.  If this ever happens to you, you basically have two options.  If you've already poured most of the batter out, just leave it.  Mixing it in now is only going to make your cake all streaky and weird.  Otherwise, you can try to mix it in with the rest of the batter by hand.

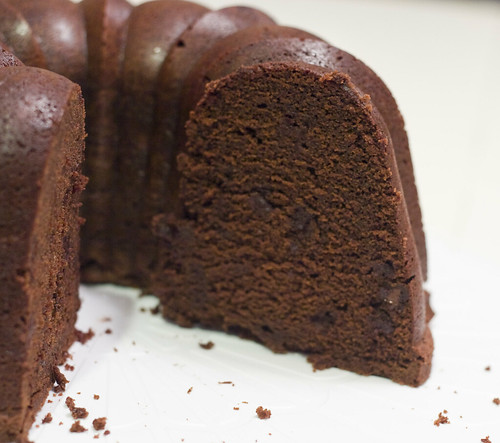
The original recipe also called for a ganache topping (6 oz chopped semisweet chocolate, 2 Tbsp unsalted butter, 1/2 c. heavy cream; heat cream to boiling and pour over butter & chocolate, whisking until smooth), but it really doesn't need it.  It is probably one of the most insanely chocolate-y cakes I have ever baked or eaten in my life.  The combination of cocoa powder, melted chocolate and then chocolate chips too bordered on unnecessary, and coming from me, that's saying something.  I think next time I may use mini-chocolate chips or leave them out altogether.


IMG_12515 by you.

All in all, this earned raves.  It was rich, moist, super chocolatey and delicious. We all ate the cake with a generous scoop (or two) of vanilla ice cream to cut the intensity a bit.  SO good.  In fact, this might be my new favorite cake recipe.  But like I mentioned before, it's enormous, so you may want to save it for really special occasions or large gatherings.

Friday, January 1, 2010

Monkey Bread, Take 2


IMG_12473 by you.

Happy New Year!!

For New Year's Day breakfast, I decided last minute to give Monkey Bread another try, this time using the shortcut that seems to be most popular, store-bought dough.  I actually happened to have a tube of refrigerated French bread dough on hand (bought for some other recipe that I never got around to making), so I opted to use that over biscuit dough.  But it was otherwise the same basic methodology: cut dough into small pieces, dip in a mixture of 1 c. melted butter, 1 1/4 c. brown sugar, 1 tsp cinnamon and 1 c. chopped pecans, toss in a bundt/tube pan and bake.

This time I used the brand-new Nordic Ware Nonstick Bundt Pan I got for Christmas and wow, what a difference that made!  For one thing, there was no burnt sugar all over the bottom of my oven, like last time (haha).  Seriously though, this pan is awesome.  Despite having gooey molten sugar in it, it pretty much unmolded the bread instantly and rinsed clean.  I'm pretty much a total Nordic Ware snob when it comes to shaped cake pans.  They are well worth the extra price, although they do occasionally turn up at discount stores like TJ Maxx, and I usually have to resist the urge to buy shapes I don't need like, say a rose-shaped bundt or a football stadium pan.

Anyhow, I thought that this batch of monkey bread was much better than last time, at least in terms of the texture of the dough.  It was also much more gooey, which was also a huge plus.  However, in terms of taste, Troy said he preferred the other dough, so I will probably go back to that recipe next time and just make it to order instead of the night before.  Still, Troy and my in-laws demolished this whole thing in no time, so I consider it a hit.

Coming up (in fact, in my oven right this moment), Chocolate-Sour Cream Bundt Cake. :)