Wednesday, October 28, 2009

Sushi-o-rama

I love sushi. I mean, I really love sushi. Like, I could eat it all day, every day. And I almost don't care where it comes from. Sushi buffet? Hell yeah! Grocery store sushi? Sure, why not! When Troy and I talk about what kind of competitive food event we could each excel at, my food is sushi.

That being said, it's really a bit of a sin that I've never tried to make sushi myself at home. You'd think that as much as I love it, I'd have given it a whirl by now, but alas, I have only laziness to blame.

A couple weeks ago, I realized that they carried sushi-grade fish at Hmart (awesome Korean grocery store chain) and I bought a little bit to try out. I bought a package of chunks listed as "sushi with vegetable" that oddly included no vegetables whatsoever. It mainly consisted of chunks of fish that I assume were scraps from trimming the nicer, larger pieces for sale. I ate it as sashimi, and it was surprisingly good, not to mention dirt cheap. So last weekend, I dragged the family out to the Hmart again and we bought about $35 worth of ingredients. As it turned out, this was enough to make quite the sushi feast...twice!


As a rule, I generally prefer sashimi, but I do also like some of the more fancy rolls that you can get nowadays. Just to make it interesting though, I decided to stick mostly with rolls the first time around. Oh, and I also used this funny little maki sushi roll maker that my grandma got me like, 10 years ago. It was a bit involved, but fun to use, and it made nice, even, square-shaped rolls. I also made a couple with the more traditional rolling mat (makisu).

The first few rolls were, well, let's just say wonky. I didn't take a lot of pictures of those. In fact, I didn't take nearly as many pictures as I would have liked overall, partly because Troy and I were starving and we were eating these as fast as I could make them, but also, it just got to be too labor-intensive, so I gave up on the pictures. All told, I probably made 4 large rolls, 4-5 small rolls, and a couple of nigiri pieces on the first night, and I still ended up with a TON of fish left over.

IMG_11742 by you.


Here's one that I made toward the end though with the makisu. In fact, I decided to get really fancy and attempt an inside out roll: eel, cucumber and asparagus, with sesame seeds on the outside.
IMG_11745 by you.

The second night, I had a better system worked out. I also decided to force Troy to wait until I had finished making everything so we could sit down and eat together like civilized people.
IMG_11750 by you.

Clockwise, from the top left: salmon, cucumber & asparagus roll, tilapia roll, tilapia and cucumber roll, spicy salmon & avocado roll, tuna nigiri (maguro), salmon nigiri (sake), and spicy tuna roll

Overall, everything was very very good. The only disappointment was the package of eel that I bought. It was rubbery (especially the skin, which I ended up having to take off) and kind of flavorless. Unagi is normally one of my favorites, so I was pretty bummed that none of the rolls I made with it were very good. I'll likely skip that the next time.

The biggest surprise was how well the package of chunks that I bought worked out. It was $6 for 3/4 lb. of tuna, salmon and tilapia. I ended up chopping the individual varieties up into smaller bits and mixing them with sauce (mayo and sriracha) to make spicy rolls and they worked out beautifully. Major bargain score.

We will definitely be doing this again. I've already told Troy that we may need to invest in one of the big flat wooden bowls (hangiri) so that I can mix the rice properly. I don't think he realizes that I'm not really kidding.

Monday, October 12, 2009

Dump Cake

IMG_11610 by you.

I don't always cook from scratch, but I am normally pretty adamant about baking from scratch. However, lately I seem to be going through a phase of throwing together convenience stuff from mixes. Last night was no exception. The weather here has cooled off quite a bit in the last week, so Troy decided to make chili, which is one of his specialties. I contributed by making cornbread (from a Marie Callendar mix), and dump cake. And I have to say, it was all super delicious.

Dump cake is basically like cobbler with cake mix for the crust. It's about as easy as it gets. I literally dumped things into a 9-inch square pan, in this order:
1 can of pie filling (I used peach, but any kind will work)
1 can of crushed pineapple (juice and all)
1 package of yellow cake mix

I spread things out a little bit so that the layers were even, but that was about it for mixing. Then I put pinches of softened butter (about 1 stick) all over the top. Bake at 350 degrees for about an hour or until the top is browned and the filling is bubbly. Best served warm, with ice cream.

IMG_11614 by you.

This was insanely sweet, so it really needed the ice cream. I've seen other versions that use canned fruit instead of pie filling. I may give that a whirl next time around.

Saturday, October 10, 2009

Random pictures

Sorry I've been MIA again. Not going to make excuses this time, but I'm working on getting back into the blogging groove. In the meantime, here are some photos of things I've cooked but been too lazy to actually write entire posts about. They're actually all things that I make on a semi-regular basis so I promise, I'll come back to them and post recipes eventually.

Curried chicken thighs with veggies, over brown rice

IMG_11260 by you.

Homemade pizza - before baking

IMG_11265 by you.

And after baking (and a minor catastrophe transferring it onto the pizza stone)

IMG_11269 by you.


And just for you, Sun, here's a "cheeseburger muffin" that I made for my daughter's school lunches. It's an idea from my friend Shannon's bento blog: basically cornbread mix, with browned ground beef and shredded cheese tossed in. Scoop and bake. My kid goes gaga for them. I also added some freeze-dried green onions, but you could make these with pretty much anything in them.

IMG_11536 by you.

Thursday, September 17, 2009

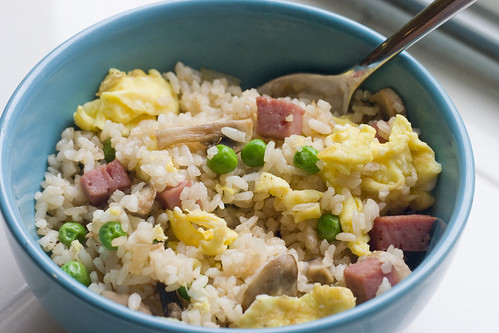
Fried Rice


Fried rice is my number one comfort food. I could probably eat it every day, and I don't care whether it's homemade, take-out or whatever, although I suppose I draw the line at frozen. It's also my favorite way to use up whatever is in my refrigerator. Over the years, I've had a number of people ask me for a fried rice recipe, and I've always had a hard time giving one because it's such a malleable dish. You can add or subtract just about anything. In fact, just the other day, I started typing up a recipe only to realize that I had added so many little footnotes that it was going to be impossible to follow. I think it'll be easier for me to just post different iterations as I happen to make them.

That being said, here's the version I made the other day. Fried rice was not an uncommon breakfast in our household when I was growing up, and that's why I almost always include ham and eggs in mine. Don't be tempted to use fresh rice - it'll get all sticky and gooey on you and turn into mush. Day-old rice is the key to good fried rice; in fact leftover take-out rice is perfect. Also, notice that there really is not a lot of soy sauce in this recipe. Fried rice does not have to be brown.

Ingredients

4 eggs, beaten

1 tbsp + 1 tsp vegetable, canola or olive oil

1/2 c. onion

1/2 c. sliced mushrooms

1 c. cubed turkey ham

1 tbsp soy sauce

4 c. rice (preferably, day old)

1/2 tsp garlic powder (optional)

1 tbsp sesame oil

1/2 c. frozen peas

Salt & pepper to taste


Directions

1. Heat a large pan or wok. Add 1 tsp. oil (or you can use cooking spray) and the beaten eggs, and cook as you would scrambled eggs. Try to leave the pieces big, as they will be broken up later when you add them back to the rice. Remove the cooked eggs from the pan and set aside. I usually just dump them back into the bowl I used to beat them.
I don't worry about contamination from the raw egg because it will get all cooked again.

2. Heat the oil in the same pan over high heat, and add the onions and mushrooms. Saute until onions turn translucent.


3. Add the cubed ham and heat through. Add the soy sauce and salt & pepper to taste.


4. Add the rice. I generally try and break up the rice as much as possible before adding it to the pan. You want the grains to be separated as much as possible.

5. Turn the heat down to medium. You want to heat the rice through, but you don't want it to burn. At this point, I usually add garlic powder and maybe more salt & pepper too.

6. Once the rice is hot, add the peas and stir them in. I throw them in still-frozen since they thaw & cook very quickly.

7. Add the sesame oil and toss thoroughly to coat everything. Sesame adds some nice aroma and helps the grains stay separated.

8. Last, but not least, add the eggs back in. Gently stir until they are hot through. Serve immediately.

Thursday, September 10, 2009

Best Lasagna Ever.

Not to brag, but I make a pretty darn good lasagna. I've been meaning to share the recipe for a while, even though it's not super fancy or unique. It's just really a good classic meaty, cheesy, tomato-y lasagna.

Lasagna was always my favorite Italian dish as a kid. It used to be the dish that I always ordered without fail. Of course, as I got older and my tastes got more sophisticated, I scoffed at lasagna and passed it over in favor of dishes like gnocchi or saltimbocca.

I started cooking it myself at the request of Troy, for whom it was a comfort food from his childhood. After a few years of experimenting and adding and subtracting from various recipes, I finally hit upon a winner. Troy has actually declared my lasagna better than his mom's (shhh, don't tell)! I'll warn you right now though, he likes his pasta super saucey, so this recipe uses a LOT of sauce. I think it must weigh about 6 lbs. (not counting the pan) by the time it goes into the oven. I also apologize in advance for my lack of precise measurements in the directions. I'm not much for measuring.

Lasagna
Ingredients
1 lb. ground beef
2 jars tomato sauce*
1 box flat lasagna sheets (I use Barilla)
(1) 15 oz. container part skim ricotta cheese
(1) 10 oz. box frozen chopped spinach, thawed
1/2 cup grated Parmesan cheese
1 egg
1 lb. shredded mozzarella cheese
Salt & pepper to taste
1 tsp each dried oregano & parsley (optional)

*I'm aware that homemade sauce is better, but I usually use jarred for convenience. My preferred brand is Barilla, but lately I've been using the Simply Natural Organic brand from Costco, with very good results. I also usually sneak at least a jar or two of baby food (either carrots, winter squash or sweet potatoes) into the sauce for extra veggies.

Directions
1. Preheat oven to 375 degrees.

2. Brown ground beef. I usually add salt, pepper and dried herbs as I cook the beef, just to give it some more flavor. Drain off grease and add about 1 cup of tomato sauce. This is also a good point to add some baby food, if you want. Trust me when I tell you that no one will ever be able to taste that it's there. Set aside and allow to cool slightly.

3. Squeeze all of the moisture out of the thawed spinach. Combine the spinach in a small bowl with the ricotta, parmesan and egg. Mix thoroughly.

4. In a 9x13 pan, add about a cup of sauce to the bottom. You want to use enough sauce to have a thin layer across the entire bottom.

5. Layer 4 uncooked pasta sheets on top of the sauce. I usually put mine lengthwise 2x2, but you can also do them 4 across. They will overlap slightly in the middle. Don't worry that they don't reach across the entire pan. They will expand as they cook and absorb moisture from the sauce.

6. Spread half the ricotta mixture on top of the pasta sheets.

7. Spread half the meat mixture on top of the ricotta.

8. Sprinkle about 1 1/2 cups of shredded mozzarella on top of the meat.

9. Spread more sauce (about 1-2 cups) on top of the cheese. Be generous with the sauce. You want to make sure you have enough moisture for the pasta sheets.

10. Repeat steps 5-9.

11. Add one more layer of pasta sheets. Cover with sauce and more mozzarella.

12. Cover the top with a double layer of aluminum foil. I usually spray the inside of the foil with cooking spray to keep it from sticking to the cheese.

13. Bake in a 375 degree oven for one hour or until heated through. In my uneven oven, this sometimes takes more like 75 minutes.

14. Let stand for 5-10 minutes before serving. This gives everything a chance to set up so that it doesn't all fall to mush the second you cut a piece.

Like I said, it's nothing fancy, but it's quick to put together (especially with those no-cook pasta sheets), hearty and delicious. I'll also add that it's a great dish to let your kids help make - our 2-year-old daughter was delighted to sprinkle on the mozzarella all by herself - which also makes them more likely to eat it, spinach and all!

Sorry, no picture this time since I was just too tired to do anything but cut and eat by the time it was done. I may try and snap one tomorrow if I can.

Wednesday, September 9, 2009

Chicken Katsu

IMG_11245 by you.

I'm starting to think I should just change the name of my blog seeing as how lately I've been cooking more from other blogs than anything else. But hey, better to post something than nothing, right?

Today's entry is chicken katsu, inspired by my love of L&L Hawaiian Barbecue, and also from this blog that I bookmarked a while back. Chicken katsu is basically the Asian equivalent of chicken fingers, but served with rice and sauce. Yum.

In retrospect, I don't know why I even needed a recipe to follow since it's really just a thinly cut or pounded chicken breast, breaded with panko and fried. Although I will concede that I would not have known which brand of tonkatsu sauce to buy without guidance.

In any case, this turned out very very yummy - pretty close to my ideal comfort food. Troy declared it to be an almost dead-on imitation of the L&L version and even Miss Pickypants (aka our 2 1/2 year-old) ate a healthy portion dipped in sauce. Extra bonus points for being an extraordinarily quick meal to throw together. Now if only we'd had some macaroni salad...

Thursday, September 3, 2009

Meatball pic

IMG_11047 by you.

Sorry, never got around to uploading the other night. As you can see, we were out of spaghetti, so we had whole wheat shells instead. Oh and Troy said that the meatballs and sauce were actually better the next day.