Showing posts with label Non-cookbook. Show all posts

Tuesday, May 3, 2011

Sinful Cinnamon Rolls

photo

I hosted a brunch a few weeks ago and used it as an excuse to make these insanely decadent cinnamon rolls.  I don't care much for Bobby Flay, but I happened to be flipping past the Food Network one night as he was talking about the sticky buns from Flour bakery in Boston, and the food porn shots of these rolls hooked me.  When I googled for recipes, I was delighted to discover that they had the actual recipe on Food Network's website since the owner of the bakery had gone up against Flay (and won!) on his "Throwdown" show.  

I made a few slight tweaks to the FN recipe based on my own personal preference and instincts since what they mentioned on the show did not seem to identically match what was in the FN recipe or other versions I'd found online that purported to be from the Flour cookbook.  Also, I went ahead and baked up a double batch since the dough recipe was scaled that way and I had a large number of people coming over. My "doubled" version is what's below.  

Warning: this recipe is not for the feint of heart, both literally and figuratively. Not only does it use about a pound and a half of butter, but it is also pretty labor intensive, requiring at least 1 1/2-2 days of prep and rise time. It will also give your stand mixer a serious workout.

Ingredients
Brioche Dough

2 1/2 c. unbleached all-purpose flour, plus more if needed
2 1/4 c. bread flour
1 1/2 pkgs (3 1/4 teaspoons) active dry yeast 
1/3 c. plus 1 tablespoon  sugar 
1 TBSP  salt 
1/2 c. cold water 
5 eggs
1 3/8 c. (2 3/4 sticks) unsalted butter, at room temperature, cut into 10 to 12 pieces

1. Using a stand mixer fitted with the paddle, combine the all-purpose flour, bread flour, yeast, sugar, salt, water, and the eggs. Beat on low speed for 3 to 4 minutes, or until all the ingredients are combined. Stop the mixer, as needed, to scrape the sides and bottom of the bowl to make sure all the flour is incorporated into the wet ingredients. Once the dough has come together, switch to the dough hook and beat on low speed for another 3 to 4 minutes. The dough will be very stiff and seem quite dry. If your dough does not seem to want to come together, add some more cold water, a teaspoon at a time, until it does.  Don't overdo it though - it is supposed to be dry-looking at this stage.

2. With the mixer on low speed, add the butter, 1 piece at a time, mixing after each addition until it disappears into the dough. Continue mixing on low speed for about 10 minutes, stopping the mixer occasionally to scrape the sides and bottom of the bowl. It is important for all the butter to be thoroughly mixed into the dough. If necessary, stop the mixer occasionally and break up the dough with your hands to help mix in the butter.  This is greasy messy process, so an apron would be a good call here.

3. Once the butter is completely incorporated, turn up the speed to medium and beat until the dough becomes sticky, soft, and somewhat shiny, another 15 minutes. It will take some time to come together. It will look shaggy and questionable at the start and then eventually it will turn smooth and silky. 

4. Turn the speed to medium-high and beat for about 1 minute. You should hear the dough make a slap-slap-slap sound as it hits the sides of the bowl. Test the dough by pulling at it; it should stretch a bit and have a little give. If it seems wet and loose and more like a batter than a dough, add a few tablespoons of flour and mix until it comes together. If it breaks off into pieces when you pull at it, continue to mix on medium speed for another 2 to 3 minutes, or until it develops more strength and stretches when you grab it. It is ready when you can gather it all together and pick it up in 1 piece.

5. Put the dough in a large bowl or plastic container and cover it with plastic wrap, pressing the wrap directly onto the surface of the dough. Let the dough proof (that is, grow and develop flavor) in the refrigerator for at least 6 hours or up to overnight At this point you can freeze the dough in an airtight container for up to 1 week.
    Goo
    1 1/2 c. (3 sticks) unsalted butter 
    3 c. firmly packed light brown sugar 
    2/3 c. honey 
    2/3 c. heavy cream 
    2/3 c. water 
    1/2 tsp salt

    In a medium saucepan, melt the butter over medium heat. Whisk in the brown sugar and cook, stirring, to combine (it may look separated, that's ok). Remove from the heat and whisk in the honey, cream, water, and salt. Strain to remove any undissolved lumps of brown sugar. Let cool for about 30 minutes, or until cooled to room temperature. You should have about 6 cups. (The mixture can be made up to 2 weeks in advance and stored in an airtight container in the refrigerator.) 

    The rolls
    In a small bowl, combine:
    1/2 c.  light brown sugar 
    1/2 c. granulated sugar 
    2 tsp ground cinnamon 
    1 c. pecan halves, toasted and chopped
    This will be the filling for the cinnamon rolls.

    1. Take your brioche dough and divide it in half.

    2. On a floured work surface, roll out the brioche into rectangle about 12 by 16 inches and 1/4-inch thick. It will have the consistency of cold, damp Play-Doh and should be fairly easy to roll. Position the rectangle so a short side is facing you. 

    3. Sprinkle half the cinnamon/sugar mixture evenly over the entire surface of the dough. Starting from the short side farthest from you and working your way down, roll up the rectangle like a jelly roll. Try to roll tightly, so you have a nice round spiral. Trim off about 1/4- inch from each end of the roll to make them even. 

    4. Use a bench scraper or a chef's knife to cut the roll into 8 equal pieces, each about 1 1/2-inches wide. 

    5. Repeat for the other half of the dough. (At this point, the unbaked buns can be tightly wrapped in plastic wrap and frozen for up to 1 week. When ready to bake, thaw them, still wrapped, in the refrigerator overnight or at room temperature for 2 to 3 hours, then proceed as directed.) 

    6. Divide the goo between two 9 by 13-inch baking dishes, covering the bottom evenly. Sprinkle an additional 1/2 c. pecans evenly over the surface of each pan. Arrange the buns, evenly spaced, in the baking dish. Cover with plastic wrap and put in a warm spot to proof until the dough is puffy, pillowy, and soft and the buns are touching-almost tripled in size, about 2 hours. [Alternately, you can also let them proof overnight in your refrigerator, which is what they supposedly do at Flour.  I have, however, read some people's comments that they can get soggy from being in the Goo too long, so try at your own risk.]

    7. Position a rack in the center of the oven, and heat to 350 degrees F. 

    8. Bake until golden brown, about 35 to 45 minutes. Let cool in the dish on a wire rack for 20 to 30 minutes. One at a time, invert the buns onto a serving platter, and spoon any extra goo and pecans from the bottom of the dish over the top.   Makes 15 large rolls.

    The buns are best served warm or within 4 hours of baking. They can be stored in an airtight container at room temperature for up to 1 day, and then warmed in a 325 degree F oven for 10 to 12 minutes before serving. 

    The Verdict
    As I mentioned before, these are pretty labor intensive.  Being the procrastinator that I am, I waited way too long to start these - like at 11pm on Saturday night with the intention of serving them at 11am on Sunday.  Not the best idea, especially since mixing the dough was a long and somewhat loud process and I had to babysit my mixer to keep it from jumping off the counter.  

    So yes, it was a time crunch, and they were a bit late to the table, but these cinnamon rolls were TO. DIE. FOR. Like, everyone-was-stuffed-full-and-still-had-to-eat-some-scrumptious.  I did realize too late that I had rolled mine along the long side instead of the short, so mine were tall instead of wide and a bit misshapen, but they were still fantastic.  I love nuts, so I think I may double the pecans next time.  

    Other random notes: 
    I was a bit short, so I subbed agave nectar for about half of the honey.  I found the goo to be surprisingly thin, which was nice in that I didn't have to strain it, but made it less satisfyingly gooey. I may cut back on the water next time, or allow it to cool overnight in the fridge to see if it thickens up more.  Not sure if using the agave nectar factored into the thinness or not.

    I also used two disposable aluminum pans for the final proof and baking.  This was initially out of necessity, since my glass baking dishes were being used for other brunch items, but turned out to be a blessing in disguise as it meant I avoided having to scrub baked-on goo out of my pans.  

    Here's a pic of the rolls before I turned them out of the pan.

    photo 

    And after. Yum.
    photo

    As I said before, this made 16 giant rolls, and while they were tasty, they are not the type of thing you want to eat a lot of. I packed most of the leftovers up and sent them home with our guests, and T declared that these were so good they should only be made once or twice a year.  I will probably bust them out again at Christmas.

      Sunday, April 24, 2011

      Pizza Night

      photo
      Yikes, 2 1/2 months since my last post. What can I say, except that life has kept me busy these last few months?  I am, however, making a new resolution to be better about keeping up with all of my various blogs.  No, really. I mean it this time. 

      About once or twice a month, usually on a Friday, we have homemade pizza night.  It's great fun and everyone is always happy since they get to put on (or leave off) whatever toppings they want.  We've been doing it for years now, and have the process down to the point where we pretty much never order delivery anymore.  Not to toot my own horn or anything, but I make a damn fine pizza. ;)

      I usually make thin-crust pizzas on a pizza stone, but I've been wanting to give the pan pizza recipe from America's Test Kitchen a try for some time now.  Of course, I'm too cheap to pay for a subscription to their website (especially since I already own one of their cookbooks), so a simple Google search brought me to a copy of the recipe on this blog.

      Confession time: the hubs and I are big eaters.  Ok, we're pigs, especially when it comes to pizza.  Even our 4-year-old daughter has been known to devour four or five adult-sized slices of restaurant/delivery pizza.  When I read that this recipe made two pizzas which would feed 4-6 people, I was a bit skeptical that this would be enough food for the three of us since the individual ones we normally make are much bigger than 9 inches.  Also, over the years, we have each become more firmly ensconced in our individual tastes.  Troy is big on pepperoni. I love sausage and mushrooms. The kiddo does not like veggies of any kind.  I knew that if we didn't each have our own pizza, there would be issues. So I doubled the recipe to make 4 pizzas.  Yeah, in retrospect, it was a little bit crazy.  Here's the doubled recipe, with a few other minor changes from the original.

      Pan Pizza
      Dough Ingredients
      3/4 c. olive oil, divided
      1 3/4 c. skim milk, warmed to 110 degrees
      4 tsp sugar
      4 2/3 c. all-purpose flour, plus extra for counter
      2 pkgs (or 4 1/2 tsp) instant yeast
      1 tsp table salt

      Toppings
      3 c. tomato sauce
      6 c. shredded part-skim mozzarella cheese
      pepperoni, sausage, bell peppers, onions, etc.

      1. Adjust oven rack to lowest position and preheat oven to 200 degrees. When oven reaches 200 degrees, turn it off. 

      2. Combine warm milk, sugar and 1/4 c. olive oil in measuring cup. 

      3. In the bowl of stand mixer, combine flour, yeast, and salt with dough hook. Turn machine to low and slowly add milk mixture. Once the dough comes together, increase speed to medium and mix until dough is shiny and smooth, about 5-10 min.  [If the dough does not want to come together (this can vary depending on weather, humidity, etc.), add a little water, a teaspoon at a time until it starts to form a ball.]  My dough was very stiff and not as smooth as I would have liked, but I just went ahead with it after 10 minutes of kneading.

      4. Turn dough onto lightly floured counter, and gently shape into ball.  Lightly grease a large bowl with cooking spray (I just re-use the mixer bowl) and place dough in greased bowl. Cover with plastic wrap and place in warm oven until doubled in size, about 30 min.

      5. Coat each of four 9-inch cake pans with 2 TB of oil. [I cut this down from the three tablespoons in the original recipe since 2 seemed to coat the pan just fine.]

      6. Transfer dough to lightly floured counter, divide in 4 pieces, and lightly roll each half into ball. Working with 1 dough ball at a time, roll and shape dough into 9 ½ inch round and press into oiled pan. Cover with plastic wrap and set in warm spot (not in oven) until puffy and slightly risen, about 20 minutes. 

      7. Preheat oven to 400 degrees.

      8. Remove plastic wrap from dough. Ladle approximately ⅔ c. sauce on each round, leaving ½ inch border around edges. Sprinkle each with about 1 ½ c. cheese and add your desired toppings. * I

      9. Bake until cheese is melted and starting to brown around edges, about 20 minutes. Remove from oven; let pizzas rest in pans for 1 minute. Using spatula, transfer pizzas to cutting board and cut each into 8 wedges. Serve.

      *The original America's Test Kitchen recipe was for pepperoni pizza, and they recommended you microwave the pepperoni on a paper towel first to render out some of the fat to keep the top of your pizza from getting greasy.  Troy and the kiddo used mini turkey pepperonis, which didn't have quite as much oil, so we skipped that step.  I used turkey Italian sausage, which I browned in a pan first.  I also added a ton of mushrooms and some caramelized onions to my pizza, but I was worried they'd dry out, so I put them under the cheese.

      I cooked up three pizzas and put the remaining dough ball in the fridge for tomorrow.  I'll update with how it held up when I get the chance.  

      photo
       
      The Verdict
      All three pizzas were excellent. Very different from our usual, but in a good way.  The crust was lovely: thick and soft and chewy.  My only minor complaint was that it was a teeny bit on the bland side, so next time I will likely season it with a little salt after shaping it in the pan. I liked that with the thicker crust and the pan, we could really load the pizzas up with sauce and toppings, compared to what we normally make, so that was also a nice change.  The biggest bonus was that I could cook all three at once, whereas I'd previously been limited to one pizza per stone.  

      Oh and the portion size? Well, I definitely underestimated how filling the crust would be.  The kiddo ate about 1/4 (or 2 slices) of her pizza.  I ate about half of mine.  Troy (who was starving by the time they came out of the oven) managed to completely polish his off, but I think he probably hurt himself in the process. 

      I really like that I can start making the dough for this as late as 4pm and still be ready to eat by 6. I'll definitely be working these into the rotation. 

      Edited to add:
      I made another pizza with the leftover dough last night and was very pleased with the results.  Because the dough was so cold when I took it out of the fridge, it didn't rise as much after putting it in the pan, but I kind of preferred it this way since it meant the crust did not end up as thick, and I had more room for toppings.  I rolled it big enough to have crust going up the sides of the pan, which again, made the crust thinner overall. In homage to my Chicago roots, I filled it more like a deep dish pizza, using some chunky homemade tomato sauce (with meat) and frozen spinach that had been defrosted and squeezed to remove excess water.  It was no Giordano's, but it turned out pretty dang good.  Now I'm thinking I need to try deep dish next. ;)

      Thursday, February 3, 2011

      Snow Day

       On Tuesday, we had a normally rare snow day due to the freezing rain/sleet the night before, followed by freezing temperatures which resulted in the roads turning into solid sheets of ice.  Being from the Midwest, this type of thing never used to phase me, but since they don't have salt trucks down here (and barely even have sand), it makes driving pretty hazardous.  So E and I took advantage of the lazy day at home to hang out, do some craft projects and bake!

      photo

      First, I made my friend Jacki's super yummy bread recipe.  Basically, you toss all the ingredients into a bread machine and let it mix and rise, but then take it out to form it into loaves and bake it in your regular oven.  Works like a charm and it's a great, no-fuss no-muss way to have freshly baked bread almost anytime.  I bought a cheap used bread machine pretty much just for this purpose. 

      One minor change I make: since I substitute slightly less than half the white flour for whole wheat, I've found that it tends to rise a bit less than I'd like, so I compensate by increasing the yeast to 1 full tablespoon.  Both Troy and the kiddo go crazy for this bread whenever I make it and usually we manage to plow through an entire loaf in less than a day.  Luckily, the recipe makes enough dough for 2 loaves. ;)


      photo 

      After the bread was done, I let E help me mix up a batch of Congo Bars from Bakerella's website.  As per her recommendation, we mixed them completely by hand, but I'm not sure it made much of a difference in the texture since they came out so underbaked, even after I added about 5 minutes to the bake time. I think next time I will bake them for longer at a lower temperature.  
       
      Even underbaked, they are still sinfully good and so easy to make with ingredients I keep on hand. I added a cup of butterscotch chips, just because I had them handy, and it might have been a bit over the top since they are already so sweet.  I may also try cutting the sugar next time by a couple ounces and see what happens.

      Wednesday, January 19, 2011

      Cranberry Oatmeal Cookies

      photo


      Last month, I had a few friends over for an impromptu knitting night, and I used that as an excuse to bake up some cookies.  Here's my version of a cranberry oatmeal cookie, adapted from an Allrecipes recipe.  I like this recipe because it's a bit more heavily spiced than your average oatmeal cookie, so it's especially good around the holidays.  I used cranberries because I hate raisins, but you could easily swap them out.  I did think these were a tad sweet the last time I made them, so I will likely cut out at least 1/4 c. of the brown sugar for a slightly milder cookie.
       
      Ingredients

      1 c. (2 sticks) unsalted butter
      1 c. packed brown sugar
      1/2 c. granulated sugar
      2 eggs
      1 tsp vanilla extract
      1 c. all-purpose flour
      1/2 c. whole wheat flour
      1 tsp baking soda
      1/2 tsp salt
      2 tsp ground cinnamon
      1/2 tsp ground cloves
      3 c. rolled oats
      1 c. dried cranberries

      Directions

      1. Preheat oven to 350 degrees.

      2. In a small bowl, combine both flours, baking soda, salt cinnamon and cloves. 

      3. In your mixer bowl, cream butter and both sugars together until light and fluffy.

      4. Add eggs, one at a time, scraping down the bowl in-between each addition.  Add vanilla and combine.

      5. Add flour mixture and mix on low until just combined.

      6. Add oats and cranberries and stir to combine.

      7.  Drop rounded tablespoons onto a parchment-lined cookie sheet.  Bake 10-12 minutes or until golden around the edges.  Do not overbake.  Allow to cool on cookie sheet for about 2 minutes before transferring to cooling rack. 

      I can't quite remember since it's been a while, but I think this makes about 4 dozen cookies.

      Thursday, June 17, 2010

      Weekend breakfast

      When I was a kid, my mom used to occasionally make crepes for the family on weekends.  I never thought it was unusual until we had guests who "oohed and aahhed" over such a fancy breakfast.  But crepes really aren't all that hard to make.  It's more or less the same as pancakes, you just cook them one at a time in a smaller pan.  I'd say the hardest part is waiting the 30 minutes for the batter to rest.  With Father's Day coming up, I figured what better way to show your appreciation than to give him a special fancy breakfast. ;)

      Here is the  recipe I used for the batter, from Crepes, Waffles & Pancakes! by Kathryn Hawkins:

      Basic Crepe Batter
      Makes 12 crepes

      Ingredients
      1 c. plain flour
      2 Tbsp. extra-fine sugar (optional)
      1 pinch salt
      2 whole eggs
      2 egg yolks
      1 1/4 c. milk
      1/3 c. unsalted butter, melted

      Directions
      1. Combine the flour, sugar  (if using), and salt in a bowl.  Make a well in the center, break in the eggs, then add the extra yolks.  Add half the milk and gradually work into the flour using a whisk.  Beat lightly until smooth, but don't over-mix.

      2. Add the remaining milk gradually, whisking gently until it is well combined.  Transfer to a batter bowl, cover loosely and leave in a cool place for 30 min.  Stir 1/4 c. melted butter into the batter before using.

      3. Lightly brush a small frying pan (6-inch diameter) with a little of the remaining butter and heat until hot.  Holding the pan, pour in about 1/4 c. batter and tilt the pan from side to side so that thte batter runs into a thin, even layer across the bottom of the pan.

      4. Place the pan over moderate heat and cook for about 1 minute or until the crepe browns around the edges and begins to curl away from the pan.  Slide a palette knife under the crepe and flip it over.  Brown the underside for a further minute.

      5. Turn out onto a wire rack lined with a clean tea towel and baking parchment.  Fold the paper and towel over the crepe to keep it moist.  Continue to make further crepes, brushing the pan with melted butter as necessary, gently stirring the batter each time it is used, and stacking the cooked crepes between sheets of parchment until you are ready to serve.

      My Notes
      I did not bother with extra-fine sugar.  I used regular granulated and it seemed to work out just fine.  I also think that they took a bit longer than a minute for each side.  Oh and this made closer to 14 or 15 for me, but I probably could have made them bigger.

      I got a fancypants crepe pan for Christmas last year, but any small nonstick pan will work just as well.  I also used a large offset spatula to lift and flip the crepes.  I found that was a bit easier to use than a regular wide spatula.

       To keep them warm, I stacked them on a plate in the oven with layers of parchment in between and a clean tea towel over the top.

      IMG_1449 by you. 
      IMG_1452 by you.


      The thing I loved the most about crepes is that you can set up an assembly line of fillings and everyone can make their own.  You can do savory or sweet, healthy or not-so-healthy, fancy or plain. ;)  I set out everything from bananas and nutella (my fave) to crushed pineapple and whipped cream to just plain old strawberry jam.

      IMG_1436 by you. 
      IMG_1438 by you. 

      I thought I was going to have enough leftover to try to make Crepes Suzette later, but these were all gobbled up in one sitting!

      Friday, February 12, 2010

      Fudge puddles

      IMG_0527 by you. 


      I've been dying to make these ever since my friend Abbie posted them on her website, The Green Wife (she has lots of great stuff there - recipes, crafts, giveaways, etc).  I mean, who doesn't love peanut butter and chocolate together, right?

      Well with the big snowstorm here in Texas, we were more or less housebound today so I decided to give it a whirl.  They're a teeny bit labor intensive, but totally worth it.  These cookies were absolutely fabulous, bordering on sinful.  I'm actually almost glad that I waited so long to make them because they are crazy addictive too.  I don't know if she mentions it on her site, but the recipe makes a TON - I ended up with about 8 dozen.

      I made it pretty much exactly as written with the exception of the fact that I halved the salt.  I figured that with all that peanut butter, it'd be plenty salty already.  I also recommend waiting until you've finished baking all the cookies before you make the fudge filling.  I made mine too early and after a while, the fudge cooled and set a bit and didn't look as pretty after being scooped and filled.  They still tasted the same, I'm just obsessive about things being pretty. ;)

      Check out the recipe here.  And don't say I didn't warn you!

      Monday, February 8, 2010

      Lemon cake

      IMG_0201 by you.


      This is one of the very first recipes that I came up with totally on my own, from scratch.  I'm not generally one to brag, but I will say that this cake usually earns raves whenever I make it.  It was inspired by the store-bought packages of sliced lemon cake my brother and I used to eat as a kid.  That stuff was a frightening shade of neon yellow but it was super lemony and I don't think I've had a cake since that had the same intense lemon flavor (although I'm sure if I went back home and ate it now, I'd find it nasty).

      There was a lot of trial and error involved in coming up with this recipe, and I still tweak it from time to time, especially if I don't have all the ingredients I need on hand.   You always hear a lot about how baking is a science and requires precision.  Well, that's only really half-true.  Sure, there are certain formulas that generally need to be followed, but I think that once you know the basic rules of how ingredients interact, it's much easier to experiment. 

      I usually let my daughter help me measure and pour in ingredients, which sometimes leads to unintended variations.  This time, she spilled most of an egg white on the counter but still managed to get the yolk into the mixer bowl.  I was actually quite pleased with how it turned out, so here is the version we made. ;)

      Ingredients
      1 c. butter, softened
      1 1/2 c. sugar
      2 whole eggs, plus 1 yolk
      1 lemon, zested & juiced (1/8-1/4 c)
      1/2 tsp lemon extract
      2 c. all-purpose flour
      1 tsp baking powder
      1/4 tsp salt
      1 c. milk*

      Directions
      1. Preheat oven to 350 degrees.  Grease a bundt pan with butter or spray oil.

      2. In a small bowl, combine flour, baking powder and salt.

      3. In the bowl of stand mixer, cream butter and sugar with paddle attachment until light and fluffy.  Add eggs, one at a time, and mix till combined.  Scrape down the sides and bottom of the bowl with a spatula after each addition. Stir in the lemon zest and lemon extract.

      4. Alternate adding the flour mixture and milk in 2-3 parts, each time mixing until just barely combined.  Scrape down sides and bottom of bowl to make sure everything has been incorporated.  Add lemon juice and stir to combine.  The batter may look a little curdled, but that's ok.

      5. Bake for 40-50 minutes or until a toothpick inserted in center comes out mostly clean.  Cool in pan for about 15-minutes, then turn out onto wire rack to cool completely.

      6.  Drizzle with lemon glaze (recipe below) and serve.

      Lemon glaze:
      In small bowl, combine 3/4 c. powdered sugar and 2-3 Tbsp of lemon juice.  Whisk until there are no lumps.  Glaze should be about the consistency of syrup.  To thicken, add more powdered sugar.  To thin, add water a few drops at a time until it reaches desired consistency.

      *I normally prefer to use whole milk when baking, or sometimes half & half or heavy cream.  I've even used sour cream for this recipe when I've been in a pinch.  I didn't have any of those on hand this time, so I just used good old skim milk.

      Wednesday, January 13, 2010

      Red-braised beef

      IMG_12581 by you.


      I actually made this a couple weeks ago, for New Year's Day, but I haven't had a chance to post about it till now.  Chinese "red-braised" beef is one of my ultimate comfort foods.  My grandmother use to make the best I have ever tasted, although my mom's is pretty darn good too.  I had my grandma teach me how to make this and a few other favorite dishes a number of years ago, following her to the grocery store and attempting to keep track of her measurements.

      It's basically a large, tough cut of beef braised in a mixture of soy sauce and other liquids until tender.  The soy sauce is what gives it the "red" color (although some will argue it's really brown, but whatevs).

      Even with a pressure cooker, this dish is pretty time-consuming, so it's best cooked at least a day ahead of time.

      Ingredients
      3-6 lbs beef boneless shank or chuck (or combination of the two), left in large pieces
      1 lb beef tendon (optional)
      1/2 c. soy sauce
      1/4 c. dark mushroom soy sauce
      1/4 c. Chinese rice wine (can also substitute mirin or even whisky in a pinch)
       3-4 cloves garlic
      3 scallions, cut into 3-4 pieces
      4-5 whole star anise pods
      1/2 tsp whole Szechwan peppercorns
      1/4 tsp black peppercorns
      Up to 1/2 c. water, as needed


      Directions
      1. In a large pressure cooker, add all ingredients.  If you like, you can tie up the star anise and peppercorns into a small sachet of cheesecloth or put them in a tea ball to make it easier to fish them out later.  However, you'll be straining the liquid at the end, so it's not completely necessary.  The liquid in the pot should come about halfway up the level of meat.  Add water, as needed, but try not to add more than 1/2 cup.

      2.  Close the lid and heat according to you pressure cooker directions.  Pressure-cook for 1-2 hours, until meat is very tender, almost (but not quite) falling apart.  If you're also using the tendon, that may take longer, so you may need to remove the meat and keep cooking the tendon separately.  Alternately, if you don't have a pressure cooker, you can do this in a large Dutch oven over low heat for 3-4 hours.

      3. Once everything is cooked, separate the meat & tendon from the liquid, and then strain the liquid into a large measuring cup or bowl.  The amount of liquid you end up with vary, but I yielded roughly a quart of liquid from 6 lbs of meat.  You will likely have much less if you did not use a pressure cooker.


      IMG_12491 by you.


      4. If you have the time, cool the liquid down in the refrigerator or freezer until the fat separates and solidifies.  Skim this fat off and discard.The meat and tendon is also much easier to handle if you allow it to cool for several hours, covered, in the refrigerator.  I usually wait until it is cooled, cut only what I'll need into 1/4-1/2 inch slices, then reheat.

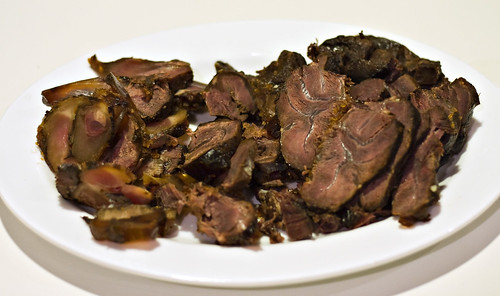
      Here's a pic of the meat and tendon, after it has been sliced.

      IMG_12568 by you.

       The meat and liquid also freeze well separately.  My mom used to freeze the liquid in plastic storage containers and then transfer the blocks to ziploc bags. Once defrosted, it makes for a quick easy dinner.


      Once your meat is cooked, there are a number of different things you can do with it. The most common is to make beef noodle soup by take the cooking liquid and turn it into a broth, and then adding beef and noodles.  It's sort of like Vietnamese pho, but with different flavor profiles.

      To make the broth, pour 2 cups braising liquid into a large stockpot.  Add 1 quart of low-sodium chicken stock (I use Pacific Natural Foods organic chicken broth).  Don't worry, the liquid has plenty of beef-y flavor and you'll never know the difference.  Add one can of diced tomatoes (liquid and all), and bring to a boil.  Add about 1/2 cup of chopped scallions just before turning off the heat.  You can also add napa cabbage or fresh spinach to the soup, if you want to get a little veg in there.

      To serve, place your desired amount of freshly boiled Chinese noodles and sliced meat in a large bowl.  Ladle the hot soup over it and eat immediately.

      You could also make green onion pancakes and serve the meat with that.  I've previously posted the recipe on my other blog.

      Notes
      I know that 3-6 lbs of meat sounds a bit broad, but it's the same amount of work to make 3 lbs as it is to make 6 lbs, so it doesn't hurt to make extra and freeze half. I usually cook somewhere around 3-4 lbs of meat.  I realize that still sounds like a lot, but it does cook down quite a bit and we don't mind leftovers around here. ;)  This was the first time I made 6 lbs because I was feeding six people instead of three, and we definitely had plenty to spare.

      Also, I'm sure a lot of you read "tendon" in the ingredients list and made a face.  But honestly, that's probably my favorite part of this dish.  It's definitely not for everyone since the texture, once cooked, is fairly gelatinous, but if you can get past that, it's really fabulous. You'll more than likely have to go to an Asian grocery store to find it though.  In the past, I've gone to meat markets and asked about it only to have butchers look at me all cross-eyed.

      As for the other cuts, I also bought large, 2-lb pieces of beef shank at the Chinese grocery store, but if you can't find those, the smaller, bone-in cross cut pieces you find at the regular grocery store will work.  Or a large chuck roast is good too.

      Thursday, January 7, 2010

      Hot pot


      IMG_12597 by you.

      I've been making fun of the dire weather warnings for the ARCTIC BLAST all week, but I have to confess, it really did get pretty dang cold!  I thought I moved to Texas to get away from phrases like "wind chill," dammit!

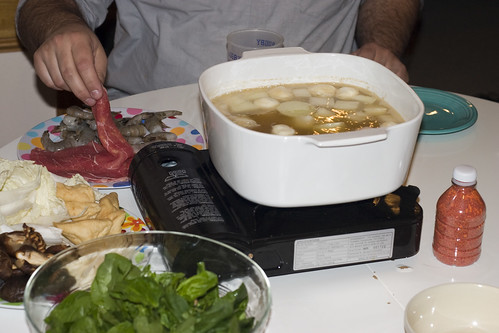
      In any case, the cold weather was a nice excuse to fire up the camp stove and eat hot pot (huo guo), also known as shabu shabu.  I have very fond childhood memories of sitting around the stovetop on our kitchen island and eating this on cold, wintry nights.  I actually did a post about it last year on my other blog, but here are a few pics from tonight's dinner.

      IMG_12593 by you.


      IMG_12598 by you.


      Tonight's version included eye of round, shell-on shrimp, fish & shrimp balls, napa cabbage, spinach, fried tofu, enoki & shitake mushrooms, and daikon radish.  I also had mung bean thread noodles soaked and ready to go, but we were so full by the end that no one could eat any.

      Saturday, January 2, 2010

      Chocolate-Sour Cream Bundt Cake


       IMG_12511 by you.


      Have I mentioned that I love the new bundt pan I got for Christmas from my lovely sister-in-law?  It's not often that I will bake twice in the same day, let alone using the same pan, but I couldn't resist trying out the recipe that came on the back of the box last night.

      You can also find a slightly different, scaled-down version of this recipe on the Williams-Sonoma website that's geared towards fitting a 10-cup pan.  It leaves out the chocolate chips and uses a glaze in lieu of ganache. I think it's probably pretty close to this recipe, but having never made it, I can't vouch for it.


      Ingredients
      1 c. non-alkalized cocoa powder, sifted; plus more for dusting pan
      7 1/2 oz. semisweet chocolate, finely chopped
      1. c boiling water
      2 1/4 c. all-purpose flour
      1 1/2 tsp baking soda
      1 1/4 tsp kosher salt
      2 1/2 sticks unsalted butter (room temperature)
      2 1/2 c. packed light brown sugar
      5 eggs, lightly beaten (room temperature)
      4 tsp. vanilla extract
      1 1/2 c. sour cream (room temperature)
      1 1/2 c. semisweet chocolate chips

      Directions
      1. Preheat oven to 325 degrees.  Grease a large bundt pan and dust with cocoa powder, tapping out excess.

      2. In a small bowl, combine the cocoa powder and 7 1/2 oz chocolate.  Add boiling water and whisk until the chocolate melts and the mixture is smooth.  Set aside to cool.

      3. In a separate bowl or over parchment paper, sift together flour, baking soda and salt.

      4. In the bowl of a stand mixer, cream the butter and sugar together until light and fluffy.  Add the eggs a little at a time, stopping occasionally to scrape down the sides of the bowl.  Add vanilla and beat in.

      5. On low speed, alternately add the flour mixture and the sour cream in 3 parts, beginning and ending with the flour, beating until just combined.  Slowly pour in the chocolate-cocoa mixture and beat until no white streaks are visible, occasionally stopping the mixer to scrape down the sides and bottom of the bowl.  You want to mix until no white streaks are visible.  Then, using a rubber spatula, gently fold in the chocolate chips.

      6.  Pour the batter into the prepared pan, spreading the batter so that the sides are about 1-inch higher on the sides than in the center.  Bake until a toothpick or skewer inserted in the center comes out mostly clean, approximately 60-70 minutes.

      7. Transfer the pan to a wire rack and let the cake cool upright in the pan for 15 minutes.  Invert the pan onto the rack and lift off the pan.  Let the cake cool completely, at least 1 hour.

      Notes
      This recipe makes a LOT of batter.  Seriously, a crazy amount.  Like, it filled most of my mixer bowl, most of my 15-cup bundt pan, and puffed up and over it during baking.  You either need to have a BIG bundt pan to make this, or be prepared to make cupcakes on the side.

      I made a few very minor changes.  I didn't have enough cocoa powder left to dust my pan, but it didn't end up being an issue since my fancy new pan is still super nonstick.  I did, however, substitute white sugar for a cup of the brown since I ran out.  And I used regular old table salt instead of kosher, which I find to be a pain to measure as accurately.  The original recipe also called for you to return the cooled cake back to the pan so that you could "gently saw off" any excess than extended over the edge of the pan and have a level bottom, but honestly, I didn't bother.

      Also, when it says to scrape down the sides (steps 4 & 5), make sure you do a thorough job.  I thought I had, but when it came time to pour the batter into the pan, I found a pool of batter at the bottom that had not been mixed properly with the chocolate mixture.  If this ever happens to you, you basically have two options.  If you've already poured most of the batter out, just leave it.  Mixing it in now is only going to make your cake all streaky and weird.  Otherwise, you can try to mix it in with the rest of the batter by hand.

      The original recipe also called for a ganache topping (6 oz chopped semisweet chocolate, 2 Tbsp unsalted butter, 1/2 c. heavy cream; heat cream to boiling and pour over butter & chocolate, whisking until smooth), but it really doesn't need it.  It is probably one of the most insanely chocolate-y cakes I have ever baked or eaten in my life.  The combination of cocoa powder, melted chocolate and then chocolate chips too bordered on unnecessary, and coming from me, that's saying something.  I think next time I may use mini-chocolate chips or leave them out altogether.


      IMG_12515 by you.

      All in all, this earned raves.  It was rich, moist, super chocolatey and delicious. We all ate the cake with a generous scoop (or two) of vanilla ice cream to cut the intensity a bit.  SO good.  In fact, this might be my new favorite cake recipe.  But like I mentioned before, it's enormous, so you may want to save it for really special occasions or large gatherings.

      Friday, January 1, 2010

      Monkey Bread, Take 2


      IMG_12473 by you.

      Happy New Year!!

      For New Year's Day breakfast, I decided last minute to give Monkey Bread another try, this time using the shortcut that seems to be most popular, store-bought dough.  I actually happened to have a tube of refrigerated French bread dough on hand (bought for some other recipe that I never got around to making), so I opted to use that over biscuit dough.  But it was otherwise the same basic methodology: cut dough into small pieces, dip in a mixture of 1 c. melted butter, 1 1/4 c. brown sugar, 1 tsp cinnamon and 1 c. chopped pecans, toss in a bundt/tube pan and bake.

      This time I used the brand-new Nordic Ware Nonstick Bundt Pan I got for Christmas and wow, what a difference that made!  For one thing, there was no burnt sugar all over the bottom of my oven, like last time (haha).  Seriously though, this pan is awesome.  Despite having gooey molten sugar in it, it pretty much unmolded the bread instantly and rinsed clean.  I'm pretty much a total Nordic Ware snob when it comes to shaped cake pans.  They are well worth the extra price, although they do occasionally turn up at discount stores like TJ Maxx, and I usually have to resist the urge to buy shapes I don't need like, say a rose-shaped bundt or a football stadium pan.

      Anyhow, I thought that this batch of monkey bread was much better than last time, at least in terms of the texture of the dough.  It was also much more gooey, which was also a huge plus.  However, in terms of taste, Troy said he preferred the other dough, so I will probably go back to that recipe next time and just make it to order instead of the night before.  Still, Troy and my in-laws demolished this whole thing in no time, so I consider it a hit.

      Coming up (in fact, in my oven right this moment), Chocolate-Sour Cream Bundt Cake. :)

      Sunday, December 27, 2009

      Lobster & Asparagus Risotto


      IMG_12328 by you.


      We did our "fancy" dinner on Christmas Eve (prime rib roast, garlic mashed potatoes, roasted asparagus). I had also bought some lobster tails with the intention of making it more of a "surf & turf" dinner, but at the last minute, I realized that we already had a ton of food.  So I decided instead to save the lobster for Christmas day.

      Well, as dinner approached, I realized I had no clue what to do with two small-ish lobster tails, other than the boring old steam or broil, followed by dunking in copious amounts of butter, which I'm honestly not a huge fan of anyways.  As I rooted around in the fridge and pantry, I remembered that I'd had a jones for risotto a couple weeks ago and decided to go ahead and make some at the last minute.

      Risotto is one of those things that sounds really fancy and hard to make, but it's basically just rice and broth and whatever else you want to add to it.  It's not hard to make, just time-consuming.  Ever since I learned how to make it, I almost never order it in a restaurant anymore.


      Ingredients
      2 T. olive oil
      2 T. butter
      3/4 c. finely chopped shallots
      2 c. uncooked arborio rice
      1/2 c. white wine
      2 qts good quality low-sodium chicken stock or broth 
      1 lb. asparagus
      2 small-medium lobster tails (mine were 3/4 lb total)
      1-2 T. butter
      2 T. cream (optional)
      1/4 c. shredded Parmesan
      salt & pepper to taste

      Directions
      1. Trim the woody ends off of the asparagus and reserve.  Cut the rest into 1-2 inch pieces.

      2. Remove lobster from shell, reserving shell.  Cut lobster into large chunks.

      3. Heat up chicken stock in a separate pot.  Add asparagus trimmings and lobster shells.  This will give your stock a boost of lobster & asparagus flavor.  Hot stock is key to making risotto.  Cold or room temperature stock will lower the overall temperature of your risotto and take much longer to cook.  It'll also affect the texture.

      4. Heat large pan over medium-high heat.  Add oil and butter and shallots.  Saute shallots until translucent.  Add rice and saute until grains start to become translucent around edges.

      5. Add white wine.  Scrape up any bits that may have stuck to the bottom of the pan and stir until it has reduced by about half.

      6. And now, start adding stock and stir, stir stir. 

      IMG_12319 by you.

      Make sure your heat is not up too high, as you want the rice to absorb the stock slowly.  You want it to be a little above a simmer, otherwise, the outside will cook too quickly and the inside will remain raw.  The reason you have to keep stirring is that you also want the rice to release its starch.  This is what gives risotto its lovely creamy texture.

      I generally add about a half cup of stock at a time (I have a 4 oz. ladle which makes this easy to measure). You want to cook until the rice has absorbed most of the liquid before adding more.  I find that this happens more quickly in the beginning, and more slowly towards the end.  It may also help you to taste the rice frequently as it cooks, so you can get a sense of the different levels of doneness.

      Just to give you an idea of when it's time to add more stock, if while stirring, you can see the bottom of the pan for more than a couple seconds, it's time.

      IMG_12320 by you.

      Add just enough stock to make it loose and slightly soupy.  Again, don't drown it.  You don't want to boil the rice.
      IMG_12321 by you.

      Then, like before, keep stirring.  In total, it should take about 20-25 minutes.

      7. Once you feel like your rice is getting close to done, add the chopped asparagus and lobster pieces.  Continue to stir and add stock, as necessary, until everything is cooked.  You may or may not use all the stock.  It all depends on your rice.

      IMG_12322 by you.

      Oh, one other warning: make sure your pan is big enough as the rice will double, if not triple, in volume.  I usually don't make this much, so I foolishly thought I'd be able to get by with a smaller pan but then had to switch to a larger one about halfway through.

      8. The rice is done when it's tender, but still has a little bit of bite to it.  Once it's reached that point, but still has a little bit of excess liquid, turn off your heat, and stir in a nice healthy knob of butter.  One-two tablespoons should do it.  You could also add a splash of heavy cream, if you like.

      9. Last, but not least grate some fresh Parmesan over the whole thing.  I usually subscribe to the school that Parmesan and seafood do not belong together, but I make an exception for risotto.  To me, it just isn't the same without a little of that sharp tang that Parmesan adds. 

      10. Season to taste with salt and pepper and serve immediately, garnished with a little more Parmesan.

      Serves 4 as main course, 8 as a side dish

      Notes
      You could easily halve or double this recipe.  It's pretty much the same amount of work, regardless of the amount.  You could also substitute shrimp or some other shellfish for the lobster, or leave it out entirely.   The lobster meat did break up a bit as a result of all the stirring, but I actually didn't mind since it meant there were bits of lobster in almost every bite.  I also used leftover champagne from our morning mimosas in lieu of white wine.  It was a very decadent meal. ;)

      I'm sure there are way better tutorials out there on how to make risotto, and I largely improvised this recipe on the fly, so I apologize if the directions are less than crystal clear.  Feel free to post any questions in the comments section and I'll do my best to clarify as needed.

      Friday, December 25, 2009

      Happy Holidays!


      IMG_12313 by you.


      We decided not to travel for the holidays this year and have our first real family Christmas at home.  It was especially exciting because this is the first year that our daughter really understood the concept of holidays, and it was fun to see how much she enjoyed the lights and decorations and of course, the presents.

      Since it was just the three of us, I didn't want to do anything too complicated for breakfast, so I nixed my original plan to make cinnamon rolls and decided to make Monkey Bread instead.  I've heard many people rave about Monkey, but I've actually never eaten any myself.  Most of the recipes I came across called for store-bought biscuit dough, cut into quarters and dipped in a mixture of sugar and butter.  I did, however, find a recipe that used yeasted dough, but it was geared towards a bread machine.  I decided to try and adapt it for my stand mixer and give it a try.

      Monkey Bread

      Ingredients
      One packet or 2 1/2 tsp active dry yeast
      3 c. all-purpose flour
      1/4 c. white sugar
      1 tsp ground cinnamon
      1 tsp salt
      2 Tbsp butter, softened
      1 c. warm water
      1 c. butter
      1 c. packed brown sugar
      1/2 c. chopped pecans

      Directions
      1. Proof the yeast in the warm water.  (I sometimes also add a pinch of flour or sugar to get it going.)

      2. In the bowl of your mixer, combine flour, sugar, cinnamon, salt, and softened butter.

      3. With the mixer running on low speed, slowly add the water & yeast mixture.  I use the paddle attachment to start.  Once the dough comes together, change to dough hook and knead on medium speed for about 5 minutes.  Dough will be fairly soft.

      4.  In a medium saucepan on low heat, melt one cup of butter, stir in brown sugar and nuts. Stir until smooth. Remove from heat and let cool slightly.

      5. Gently shape the dough into a log and cut dough in one-inch chunks. Drop one chunk at a time into the butter sugar mixture. Thoroughly coat dough pieces, then layer them loosely in a greased Bundt or tube pan, staggering layers so you're plopping each dough chunk over a space between two below. Let rise in a warm, draft-free spot until dough is just over the top of the pan, 15 to 20 minutes.

      6. Bake in a preheated 375 degree oven for 20-25 minutes or until golden brown. After removing from oven, place a plate face down in top of the pan, and (using oven mitts) flip the pan over  until bread slides out onto plate. Serve warm.

      Notes:
      I made this the night before, covered and refrigerated it.  I'm not so sure that was a good idea.  Even after taking it out of the fridge and letting it warm up at room temp for an hour or so, I don't think I got as much rise out of the dough as I should have and the resulting Monkey Bread seemed a bit dense to me.  I also used a tube/angel food pan, which I also don't recommend.  For one thing, it was way too big.  And then, because it was two pieces, the gooey brown sugar/ butter mixture oozed out the bottom and made a giant burn-y mess all over the bottom of my oven.   I think the loss of goo also made for a lackluster result. And there's nothing like scouring out your oven on Christmas morning to get you in the holiday spirit.

      Still, Troy claimed it was good and our daughter managed to eat 4-5 pieces on her own, so I guess it wasn't a total bust.  I think next time, I will definitely make it the morning of, and use a smaller one-piece pan.  I may also try halving the cinnamon in the dough and adding some to the butter mixture.


      What would Christmas be for a cookbook junkie without a few new cookbooks?  Under my tree this morning:


      I spent the better part of the day reading the Momofuku book. It's unlikely that I'll ever make a single recipe from it (though the pork belly is extremely tempting), but it was still very entertaining.

      I'm also looking forward to trying out some of the recipes from Martha's Baking Handbook.  Even though I have a bazillion baking books already, her approach always makes everything seem easier.  I have a feeling that I may never get back to Cooking with Claudine.

      Sunday, December 20, 2009

      Ricotta Coffee Cake


      IMG_12152 by you.

      My wonderful mother-in-law made this amazing coffee cake during one of her visits.  It was so rich and moist, I absolutely had to copy down the recipe.  Of course, being awash in thousands of recipes, I never got around to making it until just last month.  I made it for a knitting night with friends, and then again just a couple days ago for a potluck playdate.  It was every bit as good as I remembered.   The ricotta really adds a lovely moist tenderness to the texture of the cake.

      The wonderful bonus of this recipe?  It's actually an overnight coffee cake, so you can get it all mixed up and ready the night before, and then just sling it in the oven first thing in the morning.

      Here is the recipe, adapted from Better Homes & Gardens magazine:

      Overnight Coffee Cake
      Ingredients
      3 c. all-purpose flour
      1 1/2 tsp. baking powder
      1 1/2 tsp. baking soda
      1 tsp salt
      1 c. unsalted butter, softened
      1 1/4 c. granulated sugar
      3 eggs
      1/2 tsp vanilla
      1 (15 oz.) carton ricotta cheese
      3/4 c. chopped nuts
      1/2 c. packed dark brown sugar
      2 Tbsp toasted wheat germ
      1 heaping Tbsp ground cinnamon
      1 tsp ground nutmeg

      Directions
      1. Grease bottom and 1/2 inch up sides of 13x9x2 pan
      2. In a medium bowl, combine flour, baking powder, baking soda, & salt.
      3. In a large bowl, cream butter and sugar.
      4. Add eggs, one at a time, scraping down inbetween each addition.
      5. Add ricotta cheese and mix.
      6. Add as much of the flour mixture as you can, and stir in the remaining flour with spoon.  The batter will be thick - almost like a cookie dough.
      7. Spread batter into prepared pan
      8. In a small bowl, combine nuts, brown sugar, wheat germ, cinnamon & nutmeg.
      9. Sprinkle cinnamon mixture evenly over batter in pan.
      10. Cover & refrigerate up to 24 hours.
      11. Preheat oven to 350 degrees.  Uncover coffee cake & bake for 35-40 minutes or until toothpick comes out clean.
      12. Cool slightly in pan on a wire rack.  Serve warm.

      Because there were young children with nut allergies at the playdate, I left out the nuts this time.  However, normally, I'm a nut fanatic and double the nuts.  I also mixed the batter the morning of the playdate and baked it immediately, and it seemed to turn out just fine.  Although, I do think that the topping benefits from soaking into the batter overnight, so if you can make it in advance, you should.  It ends up a little less loose and crumbly.

      I'll also note that this last cake ended up being a tad underbaked, which I didn't realize until it sank a bit in the middle during the drive to my friend's house.  Still, it wasn't so horribly undercooked that people noticed, so I just let it go.  I'm definitely adding this to my repertoire of brunch items.

      IMG_12133 by you.