Sunday, December 27, 2009

Lobster & Asparagus Risotto


IMG_12328 by you.


We did our "fancy" dinner on Christmas Eve (prime rib roast, garlic mashed potatoes, roasted asparagus). I had also bought some lobster tails with the intention of making it more of a "surf & turf" dinner, but at the last minute, I realized that we already had a ton of food.  So I decided instead to save the lobster for Christmas day.

Well, as dinner approached, I realized I had no clue what to do with two small-ish lobster tails, other than the boring old steam or broil, followed by dunking in copious amounts of butter, which I'm honestly not a huge fan of anyways.  As I rooted around in the fridge and pantry, I remembered that I'd had a jones for risotto a couple weeks ago and decided to go ahead and make some at the last minute.

Risotto is one of those things that sounds really fancy and hard to make, but it's basically just rice and broth and whatever else you want to add to it.  It's not hard to make, just time-consuming.  Ever since I learned how to make it, I almost never order it in a restaurant anymore.


Ingredients
2 T. olive oil
2 T. butter
3/4 c. finely chopped shallots
2 c. uncooked arborio rice
1/2 c. white wine
2 qts good quality low-sodium chicken stock or broth 
1 lb. asparagus
2 small-medium lobster tails (mine were 3/4 lb total)
1-2 T. butter
2 T. cream (optional)
1/4 c. shredded Parmesan
salt & pepper to taste

Directions
1. Trim the woody ends off of the asparagus and reserve.  Cut the rest into 1-2 inch pieces.

2. Remove lobster from shell, reserving shell.  Cut lobster into large chunks.

3. Heat up chicken stock in a separate pot.  Add asparagus trimmings and lobster shells.  This will give your stock a boost of lobster & asparagus flavor.  Hot stock is key to making risotto.  Cold or room temperature stock will lower the overall temperature of your risotto and take much longer to cook.  It'll also affect the texture.

4. Heat large pan over medium-high heat.  Add oil and butter and shallots.  Saute shallots until translucent.  Add rice and saute until grains start to become translucent around edges.

5. Add white wine.  Scrape up any bits that may have stuck to the bottom of the pan and stir until it has reduced by about half.

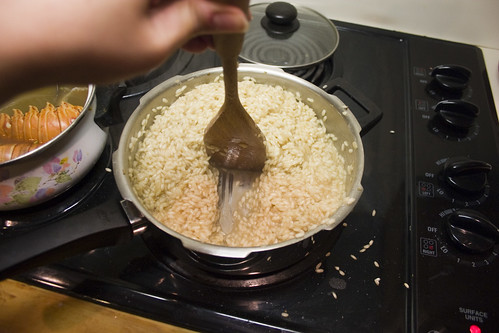
6. And now, start adding stock and stir, stir stir. 

IMG_12319 by you.

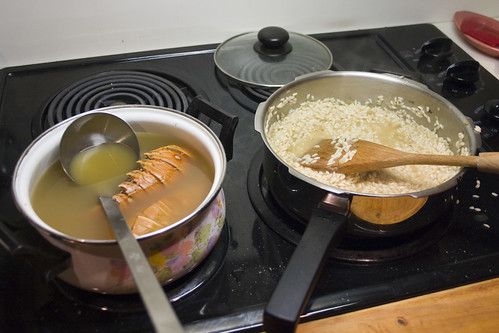
Make sure your heat is not up too high, as you want the rice to absorb the stock slowly.  You want it to be a little above a simmer, otherwise, the outside will cook too quickly and the inside will remain raw.  The reason you have to keep stirring is that you also want the rice to release its starch.  This is what gives risotto its lovely creamy texture.

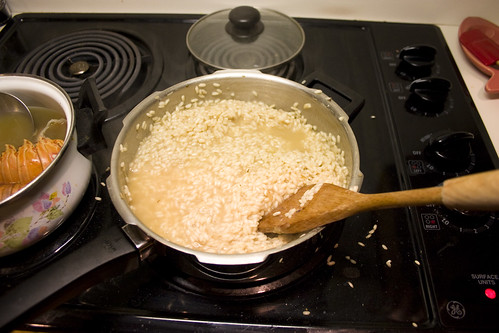
I generally add about a half cup of stock at a time (I have a 4 oz. ladle which makes this easy to measure). You want to cook until the rice has absorbed most of the liquid before adding more.  I find that this happens more quickly in the beginning, and more slowly towards the end.  It may also help you to taste the rice frequently as it cooks, so you can get a sense of the different levels of doneness.

Just to give you an idea of when it's time to add more stock, if while stirring, you can see the bottom of the pan for more than a couple seconds, it's time.

IMG_12320 by you.

Add just enough stock to make it loose and slightly soupy.  Again, don't drown it.  You don't want to boil the rice.
IMG_12321 by you.

Then, like before, keep stirring.  In total, it should take about 20-25 minutes.

7. Once you feel like your rice is getting close to done, add the chopped asparagus and lobster pieces.  Continue to stir and add stock, as necessary, until everything is cooked.  You may or may not use all the stock.  It all depends on your rice.

IMG_12322 by you.

Oh, one other warning: make sure your pan is big enough as the rice will double, if not triple, in volume.  I usually don't make this much, so I foolishly thought I'd be able to get by with a smaller pan but then had to switch to a larger one about halfway through.

8. The rice is done when it's tender, but still has a little bit of bite to it.  Once it's reached that point, but still has a little bit of excess liquid, turn off your heat, and stir in a nice healthy knob of butter.  One-two tablespoons should do it.  You could also add a splash of heavy cream, if you like.

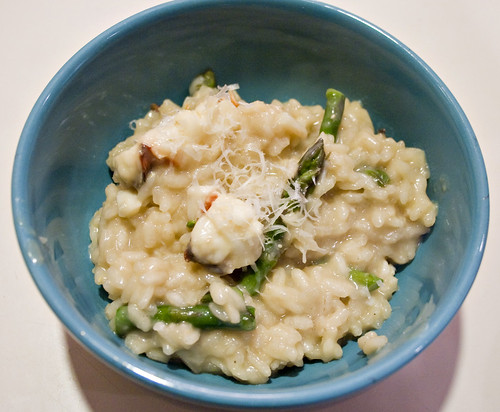
9. Last, but not least grate some fresh Parmesan over the whole thing.  I usually subscribe to the school that Parmesan and seafood do not belong together, but I make an exception for risotto.  To me, it just isn't the same without a little of that sharp tang that Parmesan adds. 

10. Season to taste with salt and pepper and serve immediately, garnished with a little more Parmesan.

Serves 4 as main course, 8 as a side dish

Notes
You could easily halve or double this recipe.  It's pretty much the same amount of work, regardless of the amount.  You could also substitute shrimp or some other shellfish for the lobster, or leave it out entirely.   The lobster meat did break up a bit as a result of all the stirring, but I actually didn't mind since it meant there were bits of lobster in almost every bite.  I also used leftover champagne from our morning mimosas in lieu of white wine.  It was a very decadent meal. ;)

I'm sure there are way better tutorials out there on how to make risotto, and I largely improvised this recipe on the fly, so I apologize if the directions are less than crystal clear.  Feel free to post any questions in the comments section and I'll do my best to clarify as needed.

Friday, December 25, 2009

Happy Holidays!


IMG_12313 by you.


We decided not to travel for the holidays this year and have our first real family Christmas at home.  It was especially exciting because this is the first year that our daughter really understood the concept of holidays, and it was fun to see how much she enjoyed the lights and decorations and of course, the presents.

Since it was just the three of us, I didn't want to do anything too complicated for breakfast, so I nixed my original plan to make cinnamon rolls and decided to make Monkey Bread instead.  I've heard many people rave about Monkey, but I've actually never eaten any myself.  Most of the recipes I came across called for store-bought biscuit dough, cut into quarters and dipped in a mixture of sugar and butter.  I did, however, find a recipe that used yeasted dough, but it was geared towards a bread machine.  I decided to try and adapt it for my stand mixer and give it a try.

Monkey Bread

Ingredients
One packet or 2 1/2 tsp active dry yeast
3 c. all-purpose flour
1/4 c. white sugar
1 tsp ground cinnamon
1 tsp salt
2 Tbsp butter, softened
1 c. warm water
1 c. butter
1 c. packed brown sugar
1/2 c. chopped pecans

Directions
1. Proof the yeast in the warm water.  (I sometimes also add a pinch of flour or sugar to get it going.)

2. In the bowl of your mixer, combine flour, sugar, cinnamon, salt, and softened butter.

3. With the mixer running on low speed, slowly add the water & yeast mixture.  I use the paddle attachment to start.  Once the dough comes together, change to dough hook and knead on medium speed for about 5 minutes.  Dough will be fairly soft.

4.  In a medium saucepan on low heat, melt one cup of butter, stir in brown sugar and nuts. Stir until smooth. Remove from heat and let cool slightly.

5. Gently shape the dough into a log and cut dough in one-inch chunks. Drop one chunk at a time into the butter sugar mixture. Thoroughly coat dough pieces, then layer them loosely in a greased Bundt or tube pan, staggering layers so you're plopping each dough chunk over a space between two below. Let rise in a warm, draft-free spot until dough is just over the top of the pan, 15 to 20 minutes.

6. Bake in a preheated 375 degree oven for 20-25 minutes or until golden brown. After removing from oven, place a plate face down in top of the pan, and (using oven mitts) flip the pan over  until bread slides out onto plate. Serve warm.

Notes:
I made this the night before, covered and refrigerated it.  I'm not so sure that was a good idea.  Even after taking it out of the fridge and letting it warm up at room temp for an hour or so, I don't think I got as much rise out of the dough as I should have and the resulting Monkey Bread seemed a bit dense to me.  I also used a tube/angel food pan, which I also don't recommend.  For one thing, it was way too big.  And then, because it was two pieces, the gooey brown sugar/ butter mixture oozed out the bottom and made a giant burn-y mess all over the bottom of my oven.   I think the loss of goo also made for a lackluster result. And there's nothing like scouring out your oven on Christmas morning to get you in the holiday spirit.

Still, Troy claimed it was good and our daughter managed to eat 4-5 pieces on her own, so I guess it wasn't a total bust.  I think next time, I will definitely make it the morning of, and use a smaller one-piece pan.  I may also try halving the cinnamon in the dough and adding some to the butter mixture.


What would Christmas be for a cookbook junkie without a few new cookbooks?  Under my tree this morning:


I spent the better part of the day reading the Momofuku book. It's unlikely that I'll ever make a single recipe from it (though the pork belly is extremely tempting), but it was still very entertaining.

I'm also looking forward to trying out some of the recipes from Martha's Baking Handbook.  Even though I have a bazillion baking books already, her approach always makes everything seem easier.  I have a feeling that I may never get back to Cooking with Claudine.

Sunday, December 20, 2009

Ricotta Coffee Cake


IMG_12152 by you.

My wonderful mother-in-law made this amazing coffee cake during one of her visits.  It was so rich and moist, I absolutely had to copy down the recipe.  Of course, being awash in thousands of recipes, I never got around to making it until just last month.  I made it for a knitting night with friends, and then again just a couple days ago for a potluck playdate.  It was every bit as good as I remembered.   The ricotta really adds a lovely moist tenderness to the texture of the cake.

The wonderful bonus of this recipe?  It's actually an overnight coffee cake, so you can get it all mixed up and ready the night before, and then just sling it in the oven first thing in the morning.

Here is the recipe, adapted from Better Homes & Gardens magazine:

Overnight Coffee Cake
Ingredients
3 c. all-purpose flour
1 1/2 tsp. baking powder
1 1/2 tsp. baking soda
1 tsp salt
1 c. unsalted butter, softened
1 1/4 c. granulated sugar
3 eggs
1/2 tsp vanilla
1 (15 oz.) carton ricotta cheese
3/4 c. chopped nuts
1/2 c. packed dark brown sugar
2 Tbsp toasted wheat germ
1 heaping Tbsp ground cinnamon
1 tsp ground nutmeg

Directions
  1. Grease bottom and 1/2 inch up sides of 13x9x2 pan
  2. In a medium bowl, combine flour, baking powder, baking soda, & salt.
  3. In a large bowl, cream butter and sugar.
  4. Add eggs, one at a time, scraping down inbetween each addition.
  5. Add ricotta cheese and mix.
  6. Add as much of the flour mixture as you can, and stir in the remaining flour with spoon.  The batter will be thick - almost like a cookie dough.
  7. Spread batter into prepared pan
  8. In a small bowl, combine nuts, brown sugar, wheat germ, cinnamon & nutmeg.
  9. Sprinkle cinnamon mixture evenly over batter in pan.
  10. Cover & refrigerate up to 24 hours.
  11. Preheat oven to 350 degrees.  Uncover coffee cake & bake for 35-40 minutes or until toothpick comes out clean.
  12. Cool slightly in pan on a wire rack.  Serve warm.

Because there were young children with nut allergies at the playdate, I left out the nuts this time.  However, normally, I'm a nut fanatic and double the nuts.  I also mixed the batter the morning of the playdate and baked it immediately, and it seemed to turn out just fine.  Although, I do think that the topping benefits from soaking into the batter overnight, so if you can make it in advance, you should.  It ends up a little less loose and crumbly.

I'll also note that this last cake ended up being a tad underbaked, which I didn't realize until it sank a bit in the middle during the drive to my friend's house.  Still, it wasn't so horribly undercooked that people noticed, so I just let it go.  I'm definitely adding this to my repertoire of brunch items.

IMG_12133 by you.

Thursday, December 17, 2009

Decorated cookies - part 3

IMG_12111 by you.

(In case you missed them, here are links to part one and part two.)


After you have what is more or less a base coat of icing on your cookies, you can do all your detail work. For me, this includes doing the outlines too. For these cookies, I pretty much just winged it and piped mostly straight lines and dots. The nice thing about snowflakes is that they can be as simple or as intricate as you want, and either way, they look good. Especially if you use sanding sugar. Sprinkles/jimmies will work too, but I prefer Sanding Sugar because of the fineness of the grains. It gives it a sparkly, snowy look.  I also meant to put on some Sugar Pearls, but I because I fell behind, I had to skip it this time.

Here's a pic of the finished cookies. Apologies for the picture quality. I dropped my DSLR the other day and it seems to be acting up now.

IMG_12116 by you.

I think this one was my favorite:

IMG_12121 by you.

I sprinkled the sugar on pretty much immediately after piping so that it would stick. Be generous with the sugar; it looks much prettier that way. I usually decorate the cookies on a small cooling rack with parchment underneath to catch the overflow. This way you can pour off the excess sugar and reuse it, if necessary.

After that, give them some more time to dry. I waited about 6 hours, but overnight would have been better. Then I bagged each cookie in an individual cellophane bag and tied with ribbon. They make great favors and teacher gifts.

Decorated cookies - part 2

(In case you missed it, here's a link to Part 1)

Today I'm going to talk about the most fun part - icing and decorating the cookies! I won't lie, this part requires a fair amount of dedication because the real key to making beautiful, elaborately decorated cookies is time and patience. As I mentioned in part one, you want to allow yourself at least 3-4 days to make decorated cookies. These are definitely NOT something that can be whipped up the night before a big party. Why so long? Because the icing can take up to a full 24 hours to dry, and depending on how you want them decorated, you may have to wait for one color to set before you can start on another.

For the icing, I stick with the standard royal icing, which is basically egg whites and powdered sugar. You can use real egg whites, but I prefer meringue powder because it's less hassle to deal with, and it's also been pasteurized, which makes it a little bit safer. You should be able to find meringue powder in the cake decorating aisle at places like Jo-Ann, Michael's or Hobby Lobby. It pretty much lasts forever, so it's worth springing for.

Anyways, I pretty much just mix the powder according to directions, which in my case was 1/4 c. powder beaten with 1/2 c. water until peaks form, then add 4 c. sifted powdered sugar. This makes for a pretty stiff icing, but don't worry about that for now. You'll be able to thin it out later as needed. Next, you'll want to start breaking your large batch of white icing down into smaller colored ones.

Let me add a word here about food coloring: most of what you can buy at the regular grocery store is crap. Don't bother. For one thing, you'll likely have to use half a bottle to get even remotely close to the shade you want. And for another, most of that stuff is water-based, which means it's going to thin out your icing and make it very difficult to pipe.

Gel-based coloring is the way to go. Again, you should be able to find these in the cake-decorating aisle of your local craft store. Wilton is probably the most readily available. In a pinch it'll do, but honestly I don't care much for the Wilton-brand colors. For one thing, they come in these annoying little pots with screw on lids, which makes them super messy to use (not to mention that they tend to leak if they're not upright), but again, the colors just aren't very deep and I find myself having to use a lot to get the bright reds and greens for Christmastime.

If you can, find a cake supply store or go online and buy the professional ones. They're more expensive, but worth it. I use these AmeriColor Soft Gel Paste Food Colors, and one drop goes a loonnngg way.
IMG_12055 by you.

OK, done with the plugs, now back to the tute.
Now here's one thing you need to be aware of: royal icing turns to cement when it dries. It is a total pain in the arse to clean up, and you really don't want to spend the next few days soaking and scraping it off of a million various bowls and spoons. So here's my tip: save a bunch of plastic containers, preferably with lids. I've been hoarding sour cream and yogurt containers for the past 2 months, along with plastic knives and spoons from takeout places, etc. Or if that's not an option, use plastic cups. This way, when you're done, you can just chunk everything into the trash. When you're not using any particular color, lay a damp paper towel on the surface of the icing and then cover with the lid or plastic wrap. This will keep the icing from drying out in-between uses.

Most people start by piping the outline of the cookie with the stiff icing and then thinning it down and "flooding" the outline to fill it in. Because my entire background is going to be one color and also because I don't like waiting for the outline to dry before I can flood, I usually just glaze the entire cookie with the thinned out icing and then go back and do the outline later. If you prefer a crisper look, then you can pipe the outline first. It all comes down to personal preference.

So after scooping some icing into a separate container and coloring it (one little drop of blue gel for about 1 1/2-2 cups of white icing), I thinned it down with a little water to make it more spreadable. There's no real formula to this - just add a couple teaspoons of water at a time and keep stirring until you reach the desired consistency.

Then I just spooned the icing on and spread it around a bit until the entire cookie was covered. Like I said, I don't mind it if the icing goes off the edges.

IMG_12054 by you.

Another word of warning: there is such a thing as thinning your icing out too much. I glazed about 6 cookies (and sprinkled them with edible glitter), then watered down my icing a LOT more to glaze the rest. I foolishly (and lazily) thought it would be faster if I could pour the icing instead of spreading it around with a spoon. Well because of all the moisture in the icing, this decision cost me an extra TWO DAYS in drying time. Gah! They were so tacky after the second day that I honestly thought they were never going to dry, and I almost threw them all in the trash. Have I mentioned that I'm a bit of a perfectionist when it comes to these things?

Anyhow, they did eventually dry, and this is why it's a good idea to start way ahead of time. The extra water also gave the icing a more shiny and translucent look which I wasn't particularly fond of. Here are the two different versions, side by side:
IMG_12105 by you.

The cookie on the left also has some edible glitter that I sprinkled on while it was still wet. I let the clerk at the store convince me that it would be pretty, but I was rather unimpressed by it. I probably won't use it again unless I'm going to use a LOT all over the entire face of the cookie.

I'm running short on time today, so I'm going to go ahead and post, and I'll show detailing and finishing touches in part 3. :)

Sunday, December 13, 2009

Holiday baking


Well, I suck. I can't believe it's been over a month since I last posted. Sincere apologies for my lameness, although in my own defense, I spent the better part of November (including Thanksgiving) sick. And since then...well, I guess I've just been lazy.

To make up for it, I thought I'd post a step-by-step of how I do my decorated sugar cookies. I absolutely LOVE baking and decorating. It's easily one of my favorite things about the holidays - a built-in excuse to make tons of goodies and then give them all away so I don't have to eat them.

Because this is a bit of a long process (generally, I try to allot at least 4 days for decorated cookies), I'm going to break it up into parts. For part one, I thought I'd share my sugar cookie recipe. I got it at a cookie decorating demo in Austin a number of years ago from the owner of Penny's Pastries. It is far and away the best recipe ever for decorated cookies. The edges stay very clean during baking, and the best part? You don't have to refrigerate it before using! You can mix it up and immediately start rolling, cutting and baking. Also, according to Penny, once iced/glazed, these cookies are shelf-stable for up to a month! This makes it a lot easier to get a head start when you have a huge batch to make.

Butter Cookie Dough
from Penny's Pastries in Austin, TX

Ingredients
1 c. salted butter
1 c. granulated sugar
1 large egg
2 tbsp whipping cream
2 tbsp vanilla extract
1 tsp almond extract
3 c. unbleached flour
1 1/2 tsp baking powder

Directions
1. Preheat oven to 325 degrees.

2. In a mixer combine butter and sugar. Mix until just incorporated - do not cream until light.

3. Add egg, cream, vanilla, and almond extract all at once and thoroughly blend. It may look curdled, but don't worry, the finished dough will be fine.

4. In a separate bowl stir together flour and baking powder. Add the dry ingredients to the wet ones and blend.

5. Roll out to a thickness of about 1/4 inch and cut with a cookie cutter.

6. Bake on a greased cookie sheet 8 to 12 minutes (depending on size) and cool on a rack. Makes about 3 dozen cookies.


My changes:
I only ever use unsalted butter when I bake (in fact, I don't even keep the salted kind in my house), so I added about a 1/2 tsp of salt to compensate. I also despise almond extract, so I replaced it with orange extract/oil. Also, if you don't have whipping cream, half-and-half or whole milk will work just as well. But don't use skim. You want that extra fat. ;)

I also skipped the greased cookie sheet in favor of parchment paper. If you have the option, try and find light-colored cookie sheets. Dark ones will make the bottoms brown too quickly. My favorites are these
AirBake sheets- I've had the same two sheets since college and they still yield perfect cookies every time.

This year, I'm making giant snowflake cookies (using this Snowflake Cookie Cutter Set that I absolutely LOVE) to give as favors at a holiday playdate. Because my cookies were gigantic, and I needed to make a lot of them, I doubled this recipe. It pretty much filled my stand mixer bowl to capacity.

I generally only like to re-roll the scraps once. I feel like after that, the dough gets difficult to work with and the cookies end up tough. So that being said, I ended up with 16 snowflakes, plus a couple dozen or so smaller random cookies cut from the edges and in-between spaces.

Coming in part two - icing!